Self-leveling epoxy fillets vs. microballoons

The Rocketry Forum

Help Support The Rocketry Forum:

This site may earn a commission from merchant affiliate links, including eBay, Amazon, and others.

lcorinth

Well-Known Member
Joined
Aug 5, 2014
Messages
1,022
Reaction score
46
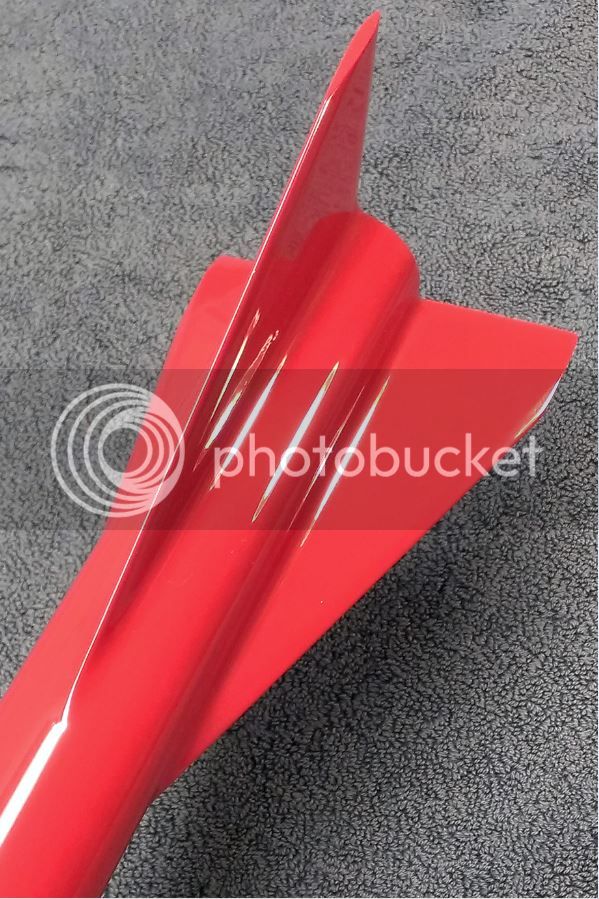
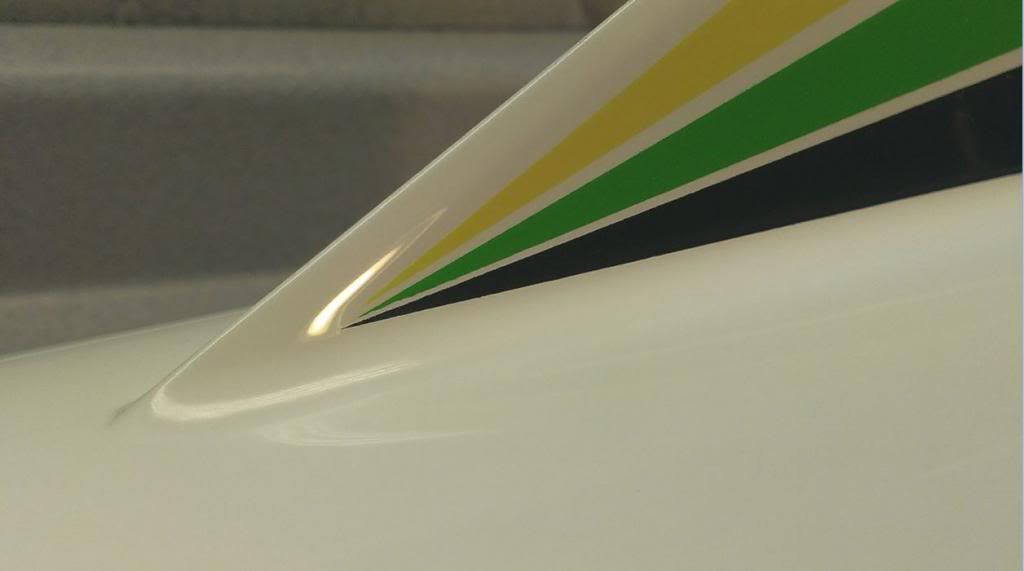
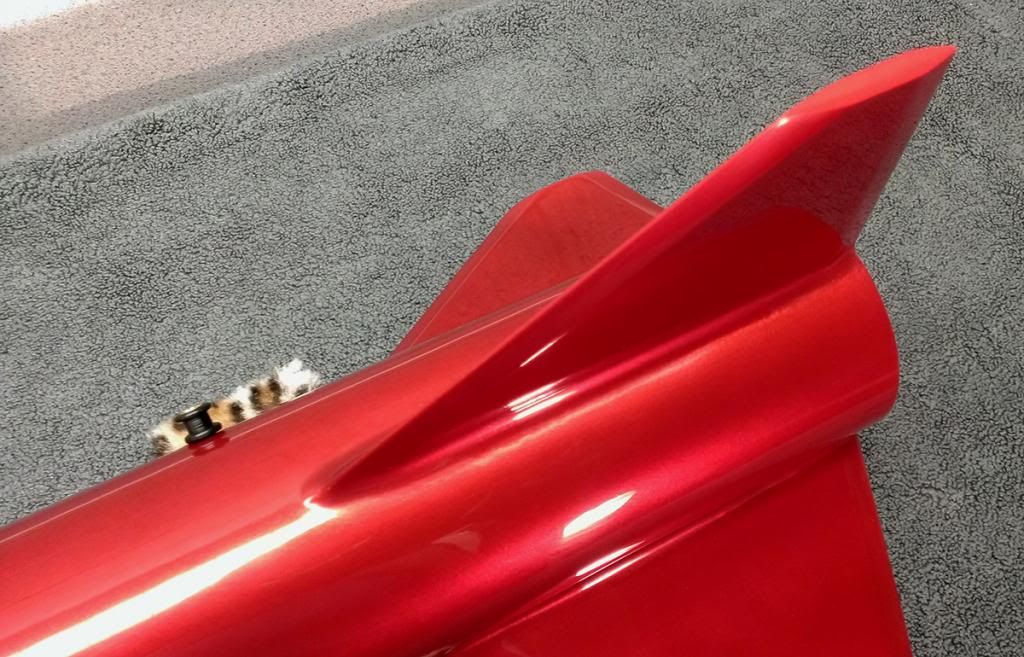
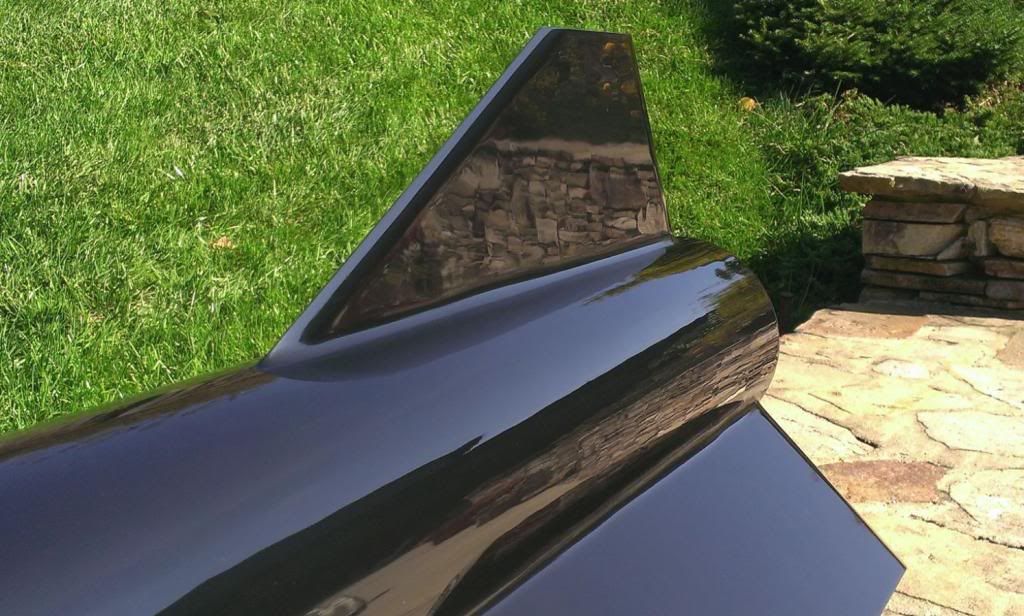
I'm using epoxy for the first time, and I'm about ready to do my fin fillets. I have a 30-minute epoxy.

For this first rocket, I was going to simply apply the epoxy fillets without filler, and allow them to self-level. I don't have any fillers like microballoons on hand, so I was going to try that on my next build and see which I liked better.

But when I was doing internal fillets on this rocket, I noticed that the epoxy would ooze over the ends of the fin tabs. I had to wipe excess epoxy off the motor tube with alcohol several times, to avoid getting clumps of epoxy which would impede me installing the rear centering ring. It made me wonder if I was going to have a problem with the fin fillets oozing over the leading and trailing edges of the fins, causing another problem I'd have to constantly wipe up to avoid weird solid drips of epoxy on the body tube.

So, now I'm thinking perhaps I should just order the microballoons and use them. My understanding about microballoons is that they not only make the epoxy more sandable, so you can sand your fillets to shape once they've cured, but that they also thicken the epoxy.

Am I right in assuming that this would help prevent the fillets from running over the edges of the fins? Also, when using microballoons, how do I know when I've added enough to the epoxy?

I know that some people do make simple epoxy fillets without fillers. How do you prevent epoxy drips in that case?

Thanks!
 
I'm not sure what epoxy you're using, but you should be using a bonding formulation for fillets. Thin runny formulations are for laminating. You might like my Epoxy Basics video.

I've watched that a few times. I found it very informative.

I guess I don't know what formulation it is, but I thought it was a bonding formulation. It's Bob Smith Industries' 30 minute slow-cure epoxy. I just picked it up at a local hobby shop, because it was available. It says it's good for bonding wood, paper, etc. I also have the five minute stuff, but didn't think that would be strong enough.
 
You can use Johnson's Baby Powder to thicken the epoxy, it makes a fairly heavy fillet. Make sure to use the one made of Talc not the Cornstarch one, and its cheap. Depending on what performance level you are building for the BSI epoxy (Bob Smith Inc, what most hobby shops carry) should do the job well enough.

The talc doesn't sand nearly as easy as the mirco balloons, but if your in a pinch (pennies or otherwise) it works.
 
Last edited:
Seriously, get some microballoons. 30min epoxy sands like...well it just doesn't sand much at all. You'll end up with a big mess. Get a dowel about the radius of your fillet and then tape off either side of each fillet with masking tape (on the fins and body tube). Mix you microballoons into your epoxy with a consistency of thick peanut butter and use your dowel to shape the fillet. Once dry, it will only need a light sanding. Oh, don't forget to pull the masking tape off before the epoxy sets.
 
You can use the delicates masking tape to mask mmt past the fins so if it dribbles or flows you can pull off instead of having to do multiple cleanings.

You can even put a flat piece at the reaf of the internal fin edge to act a bit like a dam.

Kenny
 
It's Bob Smith Industries' 30 minute slow-cure epoxy.
Yes, that should be a bonding formulation. (The 5 and 30-minute are for bonding and the 20-minute is for laminating.)

It's odd that you have having so much trouble with it running. Perhaps you can position the rocket so that the epoxy tends to sag into the gap? What I usually do is position the airframe so that I can do two fillets at a time where the epoxy will tend to stay in the joint.

I don't have experience with adding fillers to Bob Smith epoxy.
 
Whether rockets or not. When I use epoxy and need to keep it in place i use clear tape as a dam. The glue actually helps it separate from the epoxy when done and only have to clean once to get the glue off. But if I had filler it would be the way to go. As long as it doesn't weaken it.
 
Look up epoxy mico balloons on Amazon, cheap, easy to sand and fast shipping. I have more than I can ever use now. On thing you can do is mix your epoxy and wait a few minutes before you apply it, let it thicken a bit.


TA
 
I would not use micro balloons for this purpose. Micro balloons are small glass spheres, and take away from the epoxies strength. What you want is kevlar pulp or chopped carbon fiber or fiberglass. The longer strands will improve the strength of the fillet versus detracting from it.

Now, micro balloons and epoxy could be a could filler to go on top of the structural fillet. I would prefer something like Aeropoxy light or Superfil. Do not sand the structural fillet- once set apply filler and sand that.
 
It is not necessary to use either micro balloons or tape to make nice fillets. All of these fillets were made using only 15 minute epoxy and my finger. Several coats of sanded filler primer covers up minor imperfections in the fillets.

md29b6.jpg


mmpp42.jpg


onyxbuild20.jpg


pdx3b.jpg
 
I use 5-minute on my level 1 and level 2 builds for creating fillets. My level 2 rockets, however, I do use a filler. Five minute has never been a problem as I do 1 fillet at a time. I've only had one fillet crack and that was because the rocket came in as a streamer recovery instead of the intended full canopy as designed, lol. I had a brain fart and set the delay too long. The rocket arched over the apogee and began to accelerate towards the ground in a ballistic fashion. Then the recovery charge fired. It shredded the parachute. It took a hard hit on the one fin and cracked the fillet (landing was on the Utah Salt Flats).

Oh, I suppose I should tell you what I do with the non-filled epoxy. I use a syringe (I buy cases of them from Grainger) and load the mixed epoxy I then apply a bead of epoxy along the fin root but don't go all the way to the ends. The epoxy, under it's own mass begins to flatten. I tip the rocket back and forth allowing the epoxy to level and lengthen to the edges. Using 5-minute epoxy, you don't have to do this long consider the mix time and loading into a syringe. My fillets are pretty smooth and consistent by the time it sets up.
 
Last edited:
It is not necessary to use either micro balloons or tape to make nice fillets. All of these fillets were made using only 15 minute epoxy and my finger. Several coats of sanded filler primer covers up minor imperfections in the fillets.
Nathan, you have more finishing talent in your little finger than most of us have in our entire bodies.

Beautiful work.
 
Always wanted a rocket that smelt like a baby...:grin:

You can use Johnson's Baby Powder to thicken the epoxy, it makes a fairly heavy fillet. Make sure to use the one made of Talc not the Cornstarch one, and its cheap. Depending on what performance level you are building for the BSI epoxy (Bob Smith Inc, what most hobby shops carry) should do the job well enough.

The talc doesn't sand nearly as easy as the mirco balloons, but if your in a pinch (pennies or otherwise) it works.
 
Always wanted a rocket that smelt like a baby...:grin:

I have a 7 week old daughter, they don't all smell as good as baby powder all the time, however she usually does smell fairly good. :lol: I suggested the Baby powder because you can get an entire bottle of it for less than you can purchase talc powder from a supplier and have it shipped, its easy to get and it works. The downside is additional weight and its not as easy to sand as micro ballons.
 
You shouldn't be using fingers with epoxy period. Read some of the warnings of coming into contact with epoxies.
 
One additive not mentioned is fumed silica (aka colloidal silica, West Systems additive #404). Fumed silica is a thickening agent. However, you can make a mixture that is not too thick, but when applied, won't run (it's thixotropic). My big three additives are fumed silica, milled glass and high-density filler (West 406). With them, I can make epoxy do pretty much whatever I need it to do. I don't use microballons, except that they are an ingredient in Aeropoxy light, which I do use.

Jim

I recently ordered some Aeropoxy Light but have not used it yet over concerns about its strength or the lack thereof. Do you use it for structural fillets?
 
Just to reinforce what some people have already said:

Microballoons are a lightening agent not a thickening agent per se. They are essentially non-structural, and weaken the results as well as making it more brittle.

Fumed silica is a thickening agent (thixotropic).

5 minute epoxy is not good for structural purposes. The cure is too fast and the resulting plastic is weak. Use it for when a weak bond is fine and you just want to work fast.

Gerald
 
I recently ordered some Aeropoxy Light but have not used it yet over concerns about its strength or the lack thereof. Do you use it for structural fillets?

No, I never use microballon-containing materials for fillets. I have used it over the top of the fillet if I need to shape the fillet, but not anywhere where structural strength is required.

Jim
 
Yes, that should be a bonding formulation. (The 5 and 30-minute are for bonding and the 20-minute is for laminating.)

It's odd that you have having so much trouble with it running. Perhaps you can position the rocket so that the epoxy tends to sag into the gap? What I usually do is position the airframe so that I can do two fillets at a time where the epoxy will tend to stay in the joint.

I don't have experience with adding fillers to Bob Smith epoxy.

Well, it was a pretty slow ooze. It's possible I was using a little more than I needed on the internal fillets. But I wanted to be able to do the fillet and not have to watch it carefully while it sets up.

I think I may just try it and keep my eyes on it for the first set of fillets.
 
No, I never use microballon-containing materials for fillets. I have used it over the top of the fillet if I need to shape the fillet, but not anywhere where structural strength is required.

Jim
Over the top of fillets was my original thought.

Thanks for the confirmation, Jim!
 
Over the top of fillets was my original thought.

Thanks for the confirmation, Jim!

Actually, I should clarify. At one point in time, I made "rough" fillets for strength and then put either a Superfil or Aeropoxy Light coating over the top. This made things smoother for the tip to tip carbon on top of the fillet. However, I stopped doing that when it occurred to me that the light cover material could lift off of the fillet, thus weakening the tip to tip carbon application. So, I changed the procedure so that the bulk of the fillet was strong epoxy and the filler was just at the ends to smooth the transition (not even I am interested in trying to sand a transition into strong epoxy).

The first pic shows what I achieved using the filler only for the transitions. At the time I did this, I used a dowel to form the bulk of the strong epoxy fillet. The dowel stayed put until the glue cured, and then I added the extra transitions to the ends of the fillet. Now, I simply add fumed silica to the epoxy to form the bulk of the fillet and the transitions in one step. The beauty of the fumed silica is that once you form the curved shape of the fillet and the transition, it stays that way.

The second pic shows a rocket I just did using the fumed silica approach. The picture isn't very good (doesn't show the forward transition for example), but I went directly from this fillet to the tip to tip with no problems due to the shape of the fillet.

As far as the filler over the fillet goes, it's just fine to do that if you then paint the fillet (i.e., no tip to tip).

Sorry to be boring here - I just didn't post accurate information.

Jim

3-10.jpg

DSCF1027.jpg
 
It is not necessary to use either micro balloons or tape to make nice fillets. All of these fillets were made using only 15 minute epoxy and my finger. Several coats of sanded filler primer covers up minor imperfections in the fillets.

md29b6.jpg


mmpp42.jpg


onyxbuild20.jpg


pdx3b.jpg

Those are nice! How you get a finish that good is beyond my abilities, but I'd sure love to get there.
 
Actually, I should clarify. At one point in time, I made "rough" fillets for strength and then put either a Superfil or Aeropoxy Light coating over the top. This made things smoother for the tip to tip carbon on top of the fillet. However, I stopped doing that when it occurred to me that the light cover material could lift off of the fillet, thus weakening the tip to tip carbon application. So, I changed the procedure so that the bulk of the fillet was strong epoxy and the filler was just at the ends to smooth the transition (not even I am interested in trying to sand a transition into strong epoxy).

The first pic shows what I achieved using the filler only for the transitions. At the time I did this, I used a dowel to form the bulk of the strong epoxy fillet. The dowel stayed put until the glue cured, and then I added the extra transitions to the ends of the fillet. Now, I simply add fumed silica to the epoxy to form the bulk of the fillet and the transitions in one step. The beauty of the fumed silica is that once you form the curved shape of the fillet and the transition, it stays that way.

The second pic shows a rocket I just did using the fumed silica approach. The picture isn't very good (doesn't show the forward transition for example), but I went directly from this fillet to the tip to tip with no problems due to the shape of the fillet.

As far as the filler over the fillet goes, it's just fine to do that if you then paint the fillet (i.e., no tip to tip).

Sorry to be boring here - I just didn't post accurate information.

Jim
Not boring at all. The clarification is appreciated.

I hadn't thought about the potential for failure under tip to tip glassing so I'll file that away for future reference.

The multi-part fillets are another idea I'd not seen before and it makes perfect sense: Strength along the middle and ease of shaping the transitions.

Thanks for the information dump. That's how we learn.
 
Back
Top