Binary Star

The Rocketry Forum

Help Support The Rocketry Forum:

This site may earn a commission from merchant affiliate links, including eBay, Amazon, and others.

EXPjawa

Well-Known Member
Joined
Jan 27, 2015
Messages
2,212
Reaction score
84
Location
Middlesex, NY
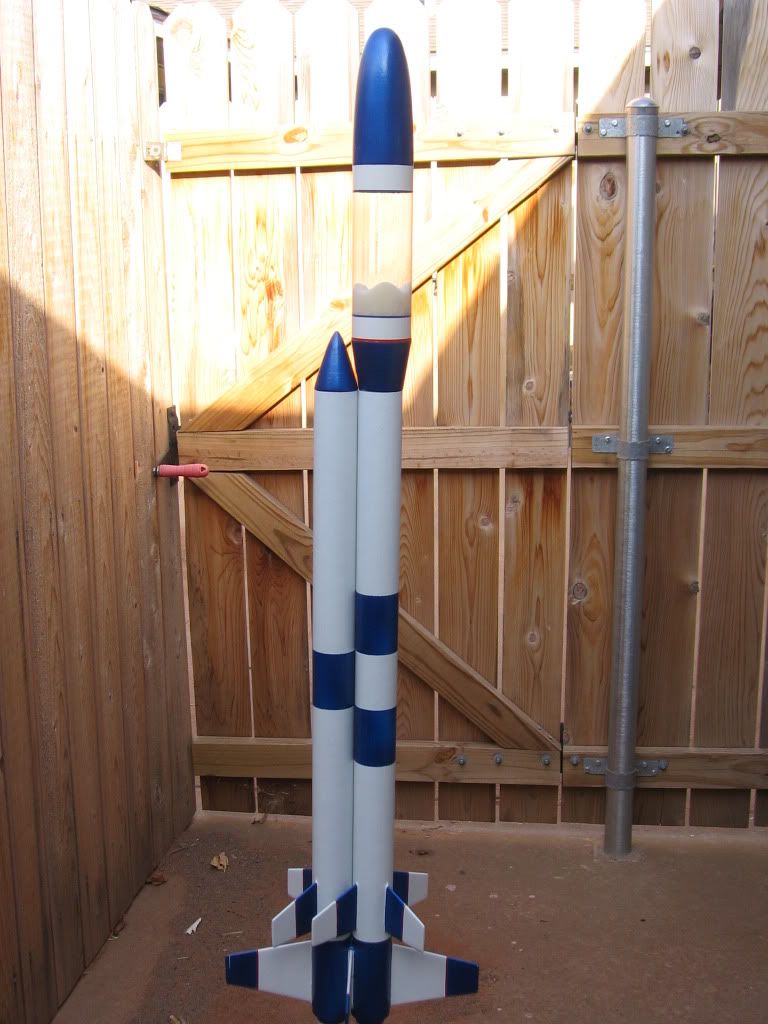
I've touched on this before, but this a build thread for a rocket design I call "Binary Star". Its basically two BT55 tubed rockets siamesed together, sort a pair of strap-on SRBs with a primary core in the middle. I originally conceived of it as a quick & dirty way to plan with staggered deployment of parachutes, but eventually decided that I couldn't get enough stagger to make it beneficial with the normal range of ejection timing available. So I modified the design just to be a unique and different means of carrying a payload. Basic layout done:

IMG_2638.jpgIMG_2641.JPGIMG_2643.jpg

Each "core" is an 18" BT55 tube with a 9" upper extension - I used 3 full standard tubes. The tubes are topped with 4.5" conical cones. The coupler on both sides is a baffle. Both tubes have 3.75" long 24mm mount, though I'll probably fly on C11's more than anything. The tubes are ported together above the baffles; the "alpha" tube carriers the recovery system, the "beta" tube has a bulkhead above the port. The beta cone is friction fitted to enclose a payload compartment. Overall rocket is 31.5" tall. After filling and most sanding:

IMG_2898.jpgIMG_2900.jpgIMG_2896.jpg

One neat thing is that with layout, launch lugs are really easy to place and align. Also note, the attached RockSim file isn't up to date. It shows a previous iteration with dual parachutes and no bulkhead or port.
 

Attachments

  • Binary Star.rkt
    90.9 KB · Views: 108
Well thank you. I've now got all the filling and sanding done and have primed the rocket:
WP_002930.jpg

I started painting it last night, spraying gloss black on two opposing fins. The other two will be white, of course, but the jury is still out on the rest of it. This is what I originally intended when I modeled it in RockSim, but I'm not sure if that's still the way I want to go:
Binary Star.jpg

The other issue is regarding launch guides - I'd glued lugs on already (and filleted/blended them in), but some of the recent discussion regarding mini/micro buttons has me wondering if I should update the design. Even though its already built, I could add them readily enough I think. If I make mount "plates" that are fitted to nest in the tube joint that I could thread into, it should work. I should decide before I go further with the painting though...
 
I wouldn't go with the green and gray if you're launching in grass or weeds. Cool color combination, though.
 
I hope so. Last night, I decided to cut off the existing lugs - which I was retrospectively concerned were too small anyway - and replaced them with plates that bridge the two tubes to mount buttons to. The bridge plates are aesthetically less pleasing then lugs set between the tubes and filleted in, but I think it'll be a much better rail guide. I ordered mini buttons to use on this, since this model is really too small (IMHO) for 1010 buttons. But that also means that I now need to set up a rail launch pad with a 20mm rail, since I'm sure if the local club has anything smaller than 1010 rails yet.
 
I always prefer rail buttons. But I haven't tried the mini buttons yet.
 
rockets7-8-11009.jpg


rockets7-8-11010.jpg


The above are a couple of pictures of one of a type of rocket that I refer to as “Binary Two Stage” using a twin motor booster, with its own recovery system, and a single motor sustainer. It flies perfectly, but with three different types of motors (D12-0, D12-3, D12-7) you really don’t want to get them mixed up.

If I were launching you rocket I’d use motors with two different delays such as C6-5 and C6-7. This way you don’t have both chutes/streamers deploying at the same time possibly tangling as a result.

I’d also install a longer shock cord on one chute with that one deployed first. It could be smaller and you would have a “Poor Man’s” dual deploy.
 
That's an interesting design. I've seen rockets that used a clustered stage to allow chute recovery, but not like that.

The concept of "poor mans" dual deployment was what I had in mind when I conceived of this rocket, but once I got to modeling it in the sim, I realized that the limitation was in the selection of delay timing. You can't really spread the deploy events far enough apart to be effective, at least not without blowing the first one too early while the rocket is still moving upwards a decent rate of speed. Even burning two C11s is enough to require a lot of delay timing to let it slow down. Even if I used a two-second stagger, it might only drop 150-200' before the second blows, and that still leaves a long drop under the main chute. I could do it, but it doesn't really gain much - I can't get it down close to the ground before the second deploy. At least not as this was designed. If I'd built it with twin 18mm mounts instead of 24mm and flew it on B engines or something, it might work more reasonably simply because it would be close to apogee after a 2 or 3 second delay.

When I realized that would be the case, I modified the design. I still thought that the twin rocket looked cool, so I didn't want to throw the airframe configuration out. Instead, I elected to use a single parachute on one side and added a bulkhead to the top of the other, so to make an altimeter-sized payload bay. Both tubes are ported together, so the ejection charge in the "beta" tube can still blow the cone on the "alpha" side if it comes first - and it takes the pressure off of the payload bulkhead. I'll soon have enough paint on it that I can weigh it and judge what size chute seems best for it.
 
Good call on “Porting” the two tubes together. It wouldn’t be good to have the “Chuted” tube’s motor not ignite thus leaving you with no chute.

Just make sure that second nose cone is securely held in place or it could inadvertently pop off just from the shock of the deployment. This from experience.
 
Aye, I'm with you there. The beta cone will be (well, already is) friction fitted to that tube like a engine might be.
 
I finally got a nice coat of gloss white sprayed on Binary Star, shown here with little Lepus.
WP_002951.jpg

And here's where I attempt to detail the bridges for rail button mounting. However, the stupid cell phone camera is no longer what it used to be, and refused to actually focus on the rocket. Before too long, replacement of the phone is in order. I tried to blend and integrate the bridges as much as possible. There's also clearance beneath them to pass a 3/16" launch rod in a pinch, though I'd imagine the fasteners attaching the buttons would have to be removed. I'm assuming that they'll pass all the way through the bridge somewhat when installed.
WP_002953.jpg

All was great until last night, when I managed to knock the thing over. The tips of the cones caught the fabric on the couch and the top 3/8" of the beta cone broke off. I was able to glue part of it back on, but it had fragmented, so it required a bit of filling - and blunting the tip of both to match - to look OK again. Now, the point of the cones is truncated at about .090" diameter, so the needle points are gone. That's probably just as well, as I doubt they would've last long in the field, but its still frustrating...
 
Last edited:
The paint work is finished. I also received my mini buttons today, so I've installed a pair as well. I stuck it on the postage scale at work to make sure I size the parachute appropriately. It comes in at 5.9 ounces without recovery bits.
WP_002964.jpgWP_002963.jpgWP_002962.jpgWP_002961.jpg
 
Wow, did that turn out sharp! I like the two black fins. Great job!
 
Thanks guys. Aesthetically, its not quite done yet; I still want to have some decals made for it. I drew up a logo for it, with two stars orbiting each other. And I'm thinking about adding a roll pattern to the top of the white section. Not that a rocket with this cross section would need a roll pattern, per se, but I think it would look good without being overdone. My only gripe with the design now is that I wish I'd laid it out to use boat tails at the ends of the tubes - Bullpup tails would probably be perfect. But the motor mounts are too recessed for that to work retrospectively. But even without, it looks pretty cool. Now if only spring would hurry up, temperatures get above 20F...
 
Thats kind cool great job, I think some flight video and pic's are in order.


TA
 
Build an upscale with boat tails!

Now there's an idea, upscale my own design :cool:. Trouble with upscaling is that the local club I belong to only clusters black powder, so I'm limited to using the big Estes motors. I don't have high confidence in the 29mm ones, they seem to have a high failure rate. If I kept the tube proportions, then moving from 24 mm to 29 mm would mean the airframe tubes would go from BT55 to BT60, and the proportionate length would grow about 7". That's not much of an upscale, though I could probably afford to go bigger still on the 29 BP motors. I think this one will be sort of overpowered on a pair of E12s, so maybe something using Aerotech 1.9 tubing (43.25" long overall) and a pair of E16 or F15 motors would do OK. If they didn't CATO. I think I'll wait till I see how this one flies first, I've got a lot of other stuff I want to build first...
 
Thanks guys. Aesthetically, its not quite done yet; I still want to have some decals made for it. I drew up a logo for it, with two stars orbiting each other.

Which two stars?

Demi Moore and Ashton Kutcher?

Jennifer Aniston and Brad Pit?

Nicole Kidman and Ton Cruise?

Deteriorating minds want to know.
 
Awesome looking Rocket(s). I also like the color of your grass. What variety is it?
 
That's Western NY Wintergreen right there. It can get up to a few feet deep, er, tall but requires an auger-type mower... :p
 
Back
Top