The creation of the CinerocDV Camera.

The Rocketry Forum

Help Support The Rocketry Forum:

This site may earn a commission from merchant affiliate links, including eBay, Amazon, and others.
Finally... News about this project.

A recap... Many of Doug's students graduated, Doug changed jobs, and while getting a better job, he lost access to the equipment his team was using for the project. Doug is also trying to get his Masters Degree, and time for the project is very limited. Me, I graduated, and moved to China. My job turned out to be a dud, and I've changed jobs to one that pays SALARY!!! So, even if we get snowed out, or a class cancels due holidays, or the kids taking tests at their public schools, I will get a reliable paycheck (almost 6 times larger than my smallest paycheck at the old job (about $209 USD for the MONTH of July).

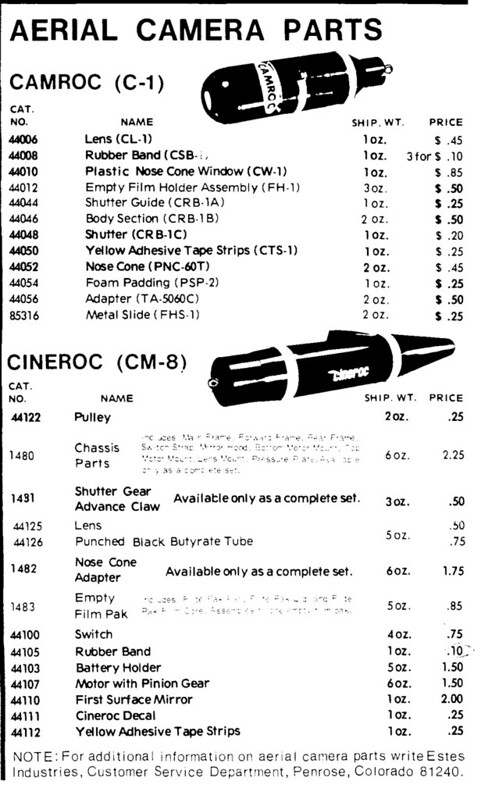
We are now working with Alex and Sheree Boyce of Boyce Aerospace Hobbies. BAH already offers a 3D printed simulated Cineroc for about $25 USD. However, those aren't compatible with the original's parts. They'll be getting the files that Doug and his team worked on, as well as authentic samples that I've managed to pull together, to help them with the project. I've also reached out to Tango Papa about the decals again. Hopefully, this will be the last push before the project is finished. The resulting files will be made available for anyone to make for themselves, or they can buy a printed copy from BAH (and get decals from Tango Papa).

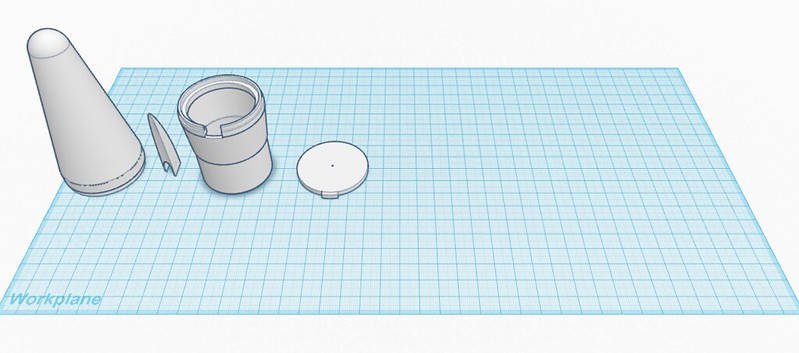
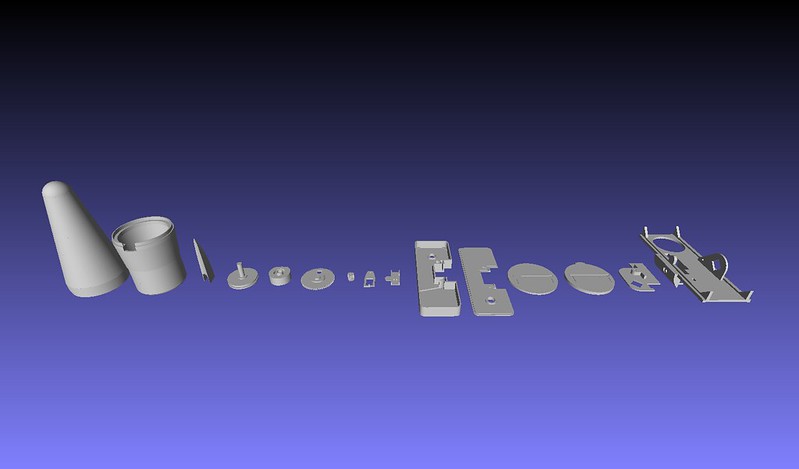
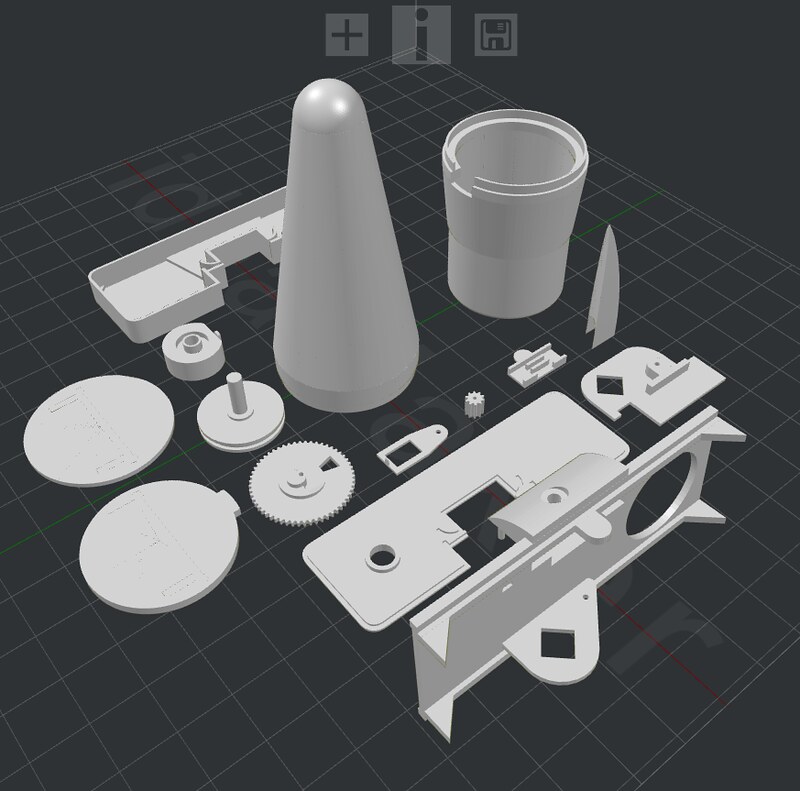
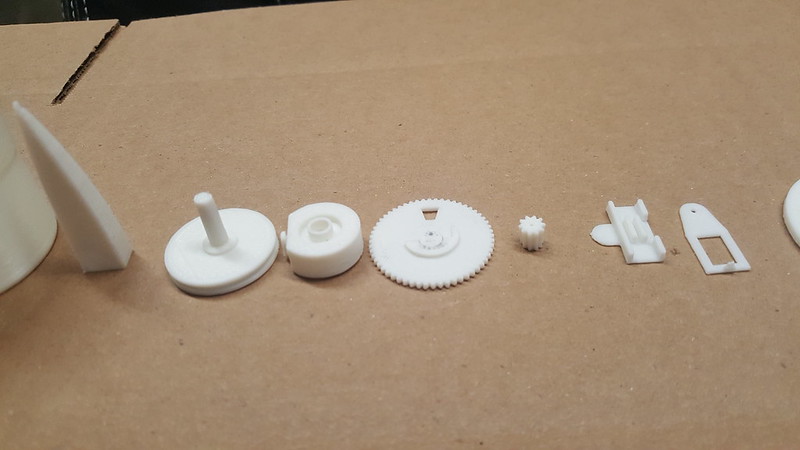
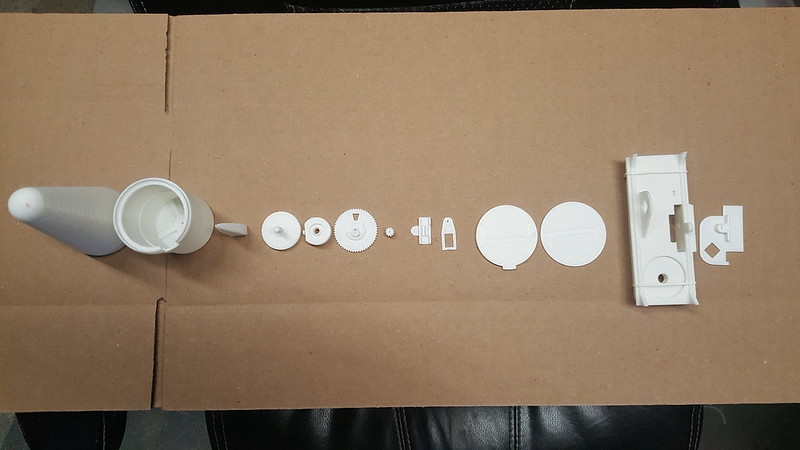
I'm hoping that the parts that are created can be used to repair damaged original Cinerocs (such as aft transitions), replace missing parts (pressure plates, pulleys, film cartridges, nosecones, etc.), or as a foundation for a completely arrangement for a new digital video camera. I'm also hoping that a 3D printed working film camera might also be created. I've also proposed a reduced risk of breakage variation of the aft transition that may help prevent the kind of damage that put so many Cinerocs out of service... by putting the eyebolt into a "well" to reduce its profile. It won't be canon, but it beats parts breaking.

Keep your fingers crossed!

Oh, and I managed to get a copy of the balsa nosecone version of the K-52P delivered to Doug. He's going to scan them for me, and then those will be added to the other sets of instructions.
 
Last edited:
OK... the latest...

Tom Prestia (Tango Papa) will shortly be receiving a set of authentic, but damaged, decals to color match from. To speed up the process, or in the event the decals are somehow lost in the mail, I've also emailed him the results of Home Depot's sampling of my fin decals. Black is black, but that blue is a hard color to match, and masking off the fins and body tube's writing would be a royal PITA if we had to do it exclusively with paint.

Alex is working on the Cineroc he's been sent to use. It too was damaged, but is still in good enough shape for measurements. Here's what we've got so far:


Besides these, he's also got a film cartridge, pulley, pressure plate, and camera shroud that were sent to him. The source of those parts are tied to parts of damaged Cinerocs from Herb Desind's collection (I'm sure he'd approve). Doug is a tad busy right now with getting his Master's Degree, along with teaching, and when he gets a break will be sending Alex the files that he and his team were able to create.

I've also managed to track down Mike Jerauld and talk to him about his adventures with Cinerocs. Imagine this... His Cineroc was launched by Vern Estes, and Mike Dorffler was there too. BUM!!! LUCKY BUM!!! :wink: I also learned why the original drawing of his was off... His nosecone was attached to the camera body by tape and it was in pristine condition. Mine weren't in such good shape. So, I was able to disassemble it for even more accuracy.
 
Last edited:
All the research has been sent to Alex, but like so many things, he's been hit with a nasty case of "Life", and hasn't had much time to devote to the project. However, he is in the business of 3D printing rocketry parts (his Cineroc nosecone shells come up for sale occasionally on Ebay), so I'm sure he'll get to it when he can.
 
How about an update?

Got this in my inbox today... (edited out some unimportant info for you folks.)

[FONT=wf_segoe-ui_normal]Re: Any News on the Cineroc?[/FONT][FONT=wf_segoe-ui_normal]
Alex Boyce

[FONT=wf_segoe-ui_normal]Ok, got the last few parts printed and test fitted. The main drive gear and motor gear are not as nice as I would like but appear to be usable. The gears have undersized pilot holes in them so they can be drilled to the correct size for the drive shaft rod. I've included the best print of each part from the various test prints we did. I believe you could build a working Cineroc with these parts, a micro drill, some glue and emery files.

I included a thumb drive with each part from A-O as seen in the attached image (A-O from left to right). I also attached a better rendering so you could see all the parts we made. I packaged all of the original Cineroc parts in the original box and in a ziplock baggie. I disassembled the broken Cineroc to measure and reproduce each part. The good Cineroc is still in it's original assembled condition.

[/FONT]
[/FONT]
[FONT=wf_segoe-ui_normal]Thanks for you patience,
[/FONT]
[FONT=wf_segoe-ui_normal]Alex Boyce[/FONT]


I'm hoping to get some photos of the prints soon.

I don't see a sled for the 808 camera in there, but we need to figure out how to mount the camera (using a first surface mirror) first.

Parts are on their way from the US.

Contact Alex Boyce (Boyce Aerospace Hobbies) for the files, or to purchase a print.

I'd like to say Thanks to Alex and Sheree Boyce, Doug Bertelsen and his team of students who worked on the 3D print files for this, as well as LW Bercini, and my anonymous donor, as well as Mike Jerauld, and everybody else who has helped me out on this project.

Thanks Guys!
 
So, once I get my parts, I'll need to source a "Camera Body". Originally that was the "Punched Black Butyrate Tube (PN 44126)"*, a 1.8 inch plastic cylinder with a few holes drilled for pinning the camera shroud to the camera body, the hole for the lens, and a notch for the "key" that kept the rest of the camera aligned with it. For my replica, I've just purchased an Estes D-Region Tomahawk (2037) for cannibalizing. That is the only kit that I'm aware of that has a body tube that is compatible with the Cineroc's parts. I'm sure I could "roll my own", but at this time, I don't have a clue on how to secure a mandrel suitable for creating a replacement camera body, nor the exact process I'd need to employ.

Other things needed to make this an accurate looking reproduction (externally at least) would be:
A screw eye (one for attaching the parachute and shock cord at the end of the aft transition (current dimension unknown),
An optional SE-3 Screw Eye** (PN 2284 (5/8" long)* (for the nosecone in the look down recovery version)
Some yellow electrical tape (originally the Yellow Adhesive Tape Strips (PN 44112))*
A white Cineroc decal (PN 44111)*(included with the camera, but optional when built)
A First Surface Mirror (PN 44110)*
A switch such as the DPDT Sub Mini Slide Switch (pt. 275-0033) still (go ahead... ask me how I know) found on RadioShack's website (visibly (externally) identical to the Switch (PN 44100)*
Gloss black spray paint


I do not know the dimensions of the actual lens (PN 44125)*,
*info found in the Estes Custom Model Rocket Parts Catalog (released sometime in 1973 or 1974)(See image below)
** info found in the Estes Cineroc Operating Manual

 
Got some photos from Alex and Sheree this evening... I think part of the delay was that he was having some trouble getting the part to his desired tolerance (50 Microns (.05mm). NICE!!! :grin:

 
Ok... Time for an update... I've located someone who thinks he can do the shroud for the camera, and I was informed today that he's got the samples I had sent to him look at now... This thing might be moving again. However, the 808 camera idea may need to be changed. We'll see how things work out.

Oh... and I got a box of rockets yesterday that included an Astron Omega K-52 (w/o Cineroc) which survived the shipping to China... Twice... (sent, stalled... threatened with destruction, returned, delayed... And resent (nearly a year later)).
 
The Omega was one of my favorite rocket designs way back when it first came out, for a lot of reasons. I never could afford the camera, though. With the modern re-creation, would you be interested in an adapter that could fit an Estes Astrocam into an Omega nosecone? I think I have enough parts/tubes to build the rocket part.
 
The Omega was one of my favorite rocket designs way back when it first came out, for a lot of reasons. I never could afford the camera, though. With the modern re-creation, would you be interested in an adapter that could fit an Estes Astrocam into an Omega nosecone? I think I have enough parts/tubes to build the rocket part.

Thanks! I appreciate the offer.

I've got several clones of the sustainer and booster (as well as originals) in various states of construction (none finished/painted though)), including multiple sets of original decals purchased from ebay.

Other than the files to recreate the shroud* that protects the first surface mirror, what I don't have is the design for the structure to support the digital camera and hold its lens up to the peephole for it to look out at the mirror in the shroud, just like the original. The hope is that the visible exterior of the CinerocDV will be indistinguishable from the original (perhaps going so far as to use original parts), but the guts will totally be different. I realize that the indistinguishable part is a real challenge, but if it could pass for an original without close inspection would be acceptable.

*I have a couple of original shrouds that are being used for measurements in the cloning process.

Pointy Side Up!
 
I wasn't thinking of trying to duplicate the Cineroc exactly, but rather to make an adapter (or hack the nosecone) to fit the Astrocam camera. Trying to fit the camera *inside* the Cineroc nosecone, with the mirror, would be a next step (and a pretty big challange - I guess you know that)
 
There are several nosecone hacks that have been done through the years... Many that have 808 cameras that have their casing removed (as would this design require), but theirs then have the lens/sensor extending outside the rocket and shielded with a larger shroud, or other cameras that simply stick through the entire body tube (with zero attempt at accuracy).

I've just got my new Estes Astrocam (digital version), but I've been busy with scans, sims, and students... And haven't had a chance to check it out with the Cineroc parts I have here.
 
Other than the files to recreate the shroud* that protects the first surface mirror, what I don't have is the design for the structure to support the digital camera and hold its lens up to the peephole for it to look out at the mirror in the shroud, just like the original. The hope is that the visible exterior of the CinerocDV will be indistinguishable from the original (perhaps going so far as to use original parts), but the guts will totally be different. I realize that the indistinguishable part is a real challenge, but if it could pass for an original without close inspection would be acceptable.

*I have a couple of original shrouds that are being used for measurements in the cloning process.

Pointy Side Up!
I am no expert on optics but have you looked into using some form of fiber optics within the shroud to transmit the exterior to the camera lens??

Edit: Did some digging on the Net and discovered that the technical term for the type of fiber optics in my question above is............ "Image Conduit".
Found some info on image conduits (Here).
 
Last edited:
I am no expert on optics but have you looked into using some form of fiber optics within the shroud to transmit the exterior to the camera lens??

Edit: Did some digging on the Net and discovered that the technical term for the type of fiber optics in my question above is............ "Image Conduit".
Found some info on image conduits (Here).
No I hadn't... I figure that if the camera is small enough, it should be possible to simply devise a sled to hold the lens in the right place. The 808 camera can do it when it is removed from its outer casing.
 
Do you have a source for the first surface mirror? What are the dimensions? Could one fudge and use a prism?
 
Do you have a source for the first surface mirror? What are the dimensions? Could one fudge and use a prism?
Making them is not hard at all... I'm planning on cannibalizing a mirrored disco ball for the mirror. There are simple applications that can then strip off the backing material, making a standard mirror a first surface mirror.

Measurements of the mirror are in the lower left of this image:
1617384739654.png
 
Ok... I've found someone who is interested in taking over the design of the printing files... So, we've got some hope that there will be progress on this being made soon. One thing that has happened from when this project started and now is that the venerable 808 #16 camera seems to have gone OOP. And while Estes has produced the new digital Astrocam rocket, it's camera doesn't look to be a good match for the project (its lens is in the wrong place for being internally mounted without significant modification to the casing. Thankfully, over on FB, Richard Boyette, posted a link to a new camera that looks like it'll fit the bill even better than the 808 would ever have done (no need to remove the outer plastic casing, and perhaps even be easier to use). I've ordered a couple.

1619815963267.png
(not my photo... My nails are much grubbier than those)
 
Solvents for PLA are much nastier and don't work as well
A little acetone or other suitable solvent should stick the two parts together nicely. {regarding ABS}
I print in PLA, which isn't dissolved by acetone - epoxy or CA are the only options with PLA.

I only started skimming this thread and will go back and read the rest of it (very nice thread) but wanted to say that I found "CASEWAY Polycarbonate Cement SC-325" works to 'weld' PLA together well enough that you can't get it back apart (or I couldn't...). It is thin like acetone so might be able to smooth PLA (but I have never tried and am traveling now so can't go test it)....

[I had the SC-325 for some other project long before I got a 3D printer and just happened to try it one day...]

Thanks!
 
Back
Top