lcorinth
Well-Known Member
- Joined
- Aug 5, 2014
- Messages
- 1,022
- Reaction score
- 46
I'm attempting my first kit bash - a pretty simple one. I'm building an Estes Cosmic Explorer to accept an E BP motor. I love my standard-built one - it flies so straight and barely rolls at all! I'd like to see what it can do on an E.
My original Cosmic Explorer:

The launch video (Estes C6-5):
[video=youtube_share;Ys8giDCMDfk]https://youtu.be/Ys8giDCMDfk[/video]
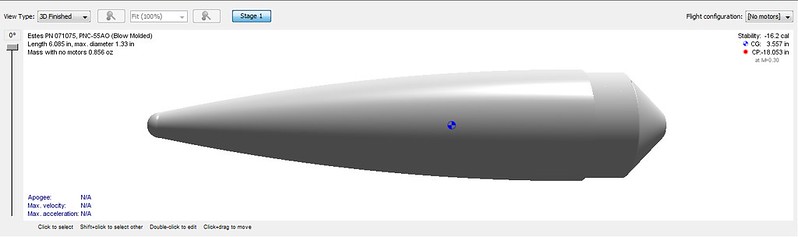
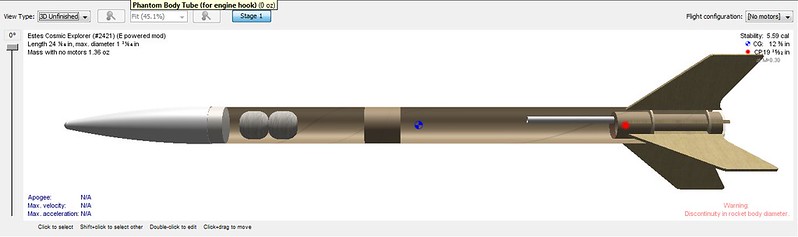
I'm trying to create a sim of the rocket so I can check for stability with the added motor weight, and so that I can run flight simulations on it. But I'm having a hard time getting the thing to look right in OpenRocket. I was unable to find it on the RocketReviews.com Estes Rocksim library.
Specifically, I'm having problems with the fins. I've taken what I think are really careful measurements, using a digital caliper (though I'm not used to using one of those) and a protractor to get the angle of the fins, but when I input the data into OR, something doesn't look right about the rocket.
In fact, when I click 100% on the view drop box, and hold the fin up to the screen, it's not even the same size - the fin on the screen is a little shorter, spanwise, than the actual fin.
Making it even more difficult is that the fins have curved corners, and a little curve where the root meets the airframe. I don't know how to make curved shapes in the freeform fin shape function, so I've had to fudge that a little bit.
I was wondering if anybody could help me with this.
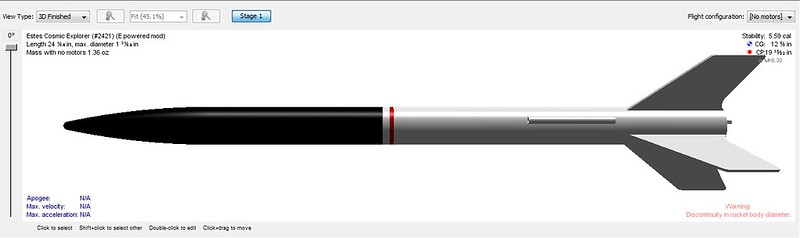
Here's a picture of what the rocket is supposed to look like:

Here's my attempt at simming the rocket:

I scanned the fin so you can see what it looks like. I've tried cropping this down to just the exposed part of the fin and uploading it into OR, but the program can't seem to determine the fin shape.
I've included a ruler for scaling:

Additional information, according to my best measurements:
Fin height: 2.222 inches
Root cord: 3.385 inches
Tip cord (guesstimate, because of the curved corners): 1.86 inch
Angle of the leading edge (from the root edge): About 42 degrees.
Angle of trailing edge: About 63 degrees.
Some of you guys seem really good at OR - would any of you be willing to take a crack at this?
Thanks!
My original Cosmic Explorer:
The launch video (Estes C6-5):
[video=youtube_share;Ys8giDCMDfk]https://youtu.be/Ys8giDCMDfk[/video]
I'm trying to create a sim of the rocket so I can check for stability with the added motor weight, and so that I can run flight simulations on it. But I'm having a hard time getting the thing to look right in OpenRocket. I was unable to find it on the RocketReviews.com Estes Rocksim library.
Specifically, I'm having problems with the fins. I've taken what I think are really careful measurements, using a digital caliper (though I'm not used to using one of those) and a protractor to get the angle of the fins, but when I input the data into OR, something doesn't look right about the rocket.
In fact, when I click 100% on the view drop box, and hold the fin up to the screen, it's not even the same size - the fin on the screen is a little shorter, spanwise, than the actual fin.
Making it even more difficult is that the fins have curved corners, and a little curve where the root meets the airframe. I don't know how to make curved shapes in the freeform fin shape function, so I've had to fudge that a little bit.
I was wondering if anybody could help me with this.
Here's a picture of what the rocket is supposed to look like:
Here's my attempt at simming the rocket:
I scanned the fin so you can see what it looks like. I've tried cropping this down to just the exposed part of the fin and uploading it into OR, but the program can't seem to determine the fin shape.
I've included a ruler for scaling:
Additional information, according to my best measurements:
Fin height: 2.222 inches
Root cord: 3.385 inches
Tip cord (guesstimate, because of the curved corners): 1.86 inch
Angle of the leading edge (from the root edge): About 42 degrees.
Angle of trailing edge: About 63 degrees.
Some of you guys seem really good at OR - would any of you be willing to take a crack at this?
Thanks!