more wood glue on cardboard

The Rocketry Forum

Help Support The Rocketry Forum:

This site may earn a commission from merchant affiliate links, including eBay, Amazon, and others.

watermelonman

Well-Known Member
Joined
Sep 22, 2014
Messages
2,597
Reaction score
10
I understand that wood glue on cardboard should make a joint stronger than the base material. However it still feels weird to have used epoxy all over a rocket when joining plastic to cardboard and then revert to wood glue elsewhere!

Do people actually do that? Is there any downside to sticking to epoxy for the cardboard to cardboard joints?
 
You can use epoxy for cardboard to cardboard. It is a tad heavier and a bit of overkill, but if you already have some made up feel free to use it
 
What about those who are obsessed about filling spirals in with bondo or putty or epoxy?
Is it really necessary to do this? Doesn't it result in a lot of sanding to remove the excess?
How do you mix this up, and is it two part, or right out of a can?
 
Most fillers I use are right out of the can (or tube). Have used both Elmer's wood filler and Bondo spot putty. And yes, they require additional sanding.
 
What about those who are obsessed about filling spirals in with bondo or putty or epoxy?
Is it really necessary to do this? Doesn't it result in a lot of sanding to remove the excess?
How do you mix this up, and is it two part, or right out of a can?

Bondo Glazing and Spot Putty (BGSP)... it's a ONE PART material that comes in a tube at the auto supply...

NOT "Bondo-Glas" used as a body filler to cover up bad dents and poor body work... that DOES use an epoxy-like hardener and has to be mixed, and is VERY heavy...

BGSP is basically primer solids (red oxide dust) in a lacquer thinner, just enough to make it the consistency of toothpaste... a little dab'll do ya... just daub it over the spiral, level it out with a squeegee or old credit card, and then sand it an hour later after its had a chance to dry out well...

Simple and quick and works like a champ in one application...

Later! OL JR :)
 
Epoxy is sort of the "universal" adhesive, but it is not necessarily the best one for everything. Sure, you can use it for the cardboard bonding, but it will be heavier and not as strong as titebond II. And you have to wear gloves and it stinks.
 
I understand that wood glue on cardboard should make a joint stronger than the base material. However it still feels weird to have used epoxy all over a rocket when joining plastic to cardboard and then revert to wood glue elsewhere!

Do people actually do that? Is there any downside to sticking to epoxy for the cardboard to cardboard joints?

I am doing just that on my current build. It's built with wood glue with two exceptions. I am epoxying a wooden bulkhead into the plastic nosecone and I plan on using epoxy for the fillets.
 
Epoxy is sort of the "universal" adhesive, but it is not necessarily the best one for everything.

Epoxy also has the general characteristic of turning brittle after prolonged exposure to sunlight and UV. Which may or may not make a difference on your rocket (I don't store mine laid out in the back yard). OTOH, most white and yellow glues can soften after prolonged exposure to moisture, so if you lay your rocket on its side for storage you might come back to find the fins folded over.

Epoxy is a booger to sand after it has cured. So are white and yellow glues.

Epoxy can pose problems with compatibility with paint. So can white or yellow glue.

I guess the bottom line is: use what you like, what works, what you already have a 27 gallon supply on the shelf, etc. If epoxy is required for joining specific materials, there is not much point in trying to use white glue.

For me, I seldom use it just purely because white or yellow glue works just fine for me, they are the adhesives that I started with, I build 99 percent low- or mid-power, and these glues are much less expensive than most hobby epoxy kits.
 
I just got done doing a "Personal Critique" of my TLP Indigo Build Thread, and found a piece of Information that is relevant to this Thread.
When "Double Gluing Fins", say, Balsa to Cardboard that has been stripped of its Glassine Layer, and using Wood Glue, be sure you get it right on the first Mounting/Set up. I had a Fin on that Build that was a little Wonky, and I had to remove and "Re-do" it.
At the Time I was so into trying to use Double Gluing that I'de forgotten about the Technique of using a drip of CA on either end of the Root Edge of the Fin to BT Joint, in conjunction with the Primary Adhesive.
Anyhow, I could have saved myself a lot of work if I'de have just used that like I had back when I used to set fins with Eyeball and Epoxy.
The Fin did'nt soak up the Glue the second time around obviously and I had to resort to Epoxy.
Wood Glue is just fine and super strong as long as you get it right on the first go.
 
Last edited:
We have used lots of carbon and epoxy building and modifying our bicycles. www.veloliner.com . Nothing wrong with using micro or other similar extremely light weight filler. I have used lots of cotton flox. It is extremely strong but is hard to sand and make a smooth, non-wavy finish.

I would keep the finish as smooth as possible but smooth does not trump shape and small frontal area.

Sanding is the king if you just can not pop a perfect shape from a mold. What I use are belts stretched over a bow, with the movement in the direction of air flow.

I used to use West and tried other Gungeon brothers epoxy. Developed a dermatitis and asthma from it. I use UScomposites.com epoxy now.

One way to make the tubes is to use cardboard tubes and then cover them with shrink tubing. Soller composites has a great online tutorial about the technique.

I have not built any rockets using this techniques as my machines don't have the performance to warrant the construction yet My flying field is not a dry lake bed.

My experience is in weaponry and never will shoot at anything I can't see. Would hate to see my carbon rocket come down on one of my neighbors cows or children.
 
Last edited:
I prep my paper tubes with Titebond wood glue, first by filling the spirals, then coat 2 to 3 coats over the whole outside for sanding. And after the engine mount is in I coat the inside of the tube to help prevent heat damage to the tube. I do the same to balsa fins under 8sq inches, no elmers wood filler. Larger balsa fins get papered an coated with Titebond. Fillets are done in titebond too. Only TTW fins get epoxy on the inside only of the BT after titebond mounting for reinforcing.
I'll be getting into more epoxy as I get into bigger rockets, but not until warm weahter so I can do it outside.
I mentioned this somewheres in another thread about clear coats, but I'm starting to use fishing rod epoxy as a clear coat. It's flexible, hard, scratch resistant and has UV prohibitors in it. You can add colors, Pearls, and metalics in it. I've only done one so far, it only put 5 grams onto my Estes Bull Pup 12D, and that was extra thick. Only drawback is that it is a self leveling, slow set epoxy. You have to keep rotating it every few minutes for a few hours, and then 10 minutes for few more.
I may invest in turning motor for fishing rods and alter it to accept dowels out of the engine mount.
Everyone has their own little ways of doing things. This is mine.
With a good white primer coat, you add a color pearl to the finish epoxy and skip the paint process all together. It would not be hard to do multi colors either. Metalic in the epoxy on the fins with a different color base coat. If you ever seen Mother of Pearl from sea life lining shells in the sunlight. That is what non-colored pear looks like over white. Read, oranges, pinks, greens & Blues. Sometimes gold. They basically grind the Mother of Pearl up into powder and mix it into the epoxy, or paint for auto motive use.
 
Last edited:
You can actually do fiberglass with Titebond instead of epoxy. May not be as strong, and not waterproof, but still impressive.
 
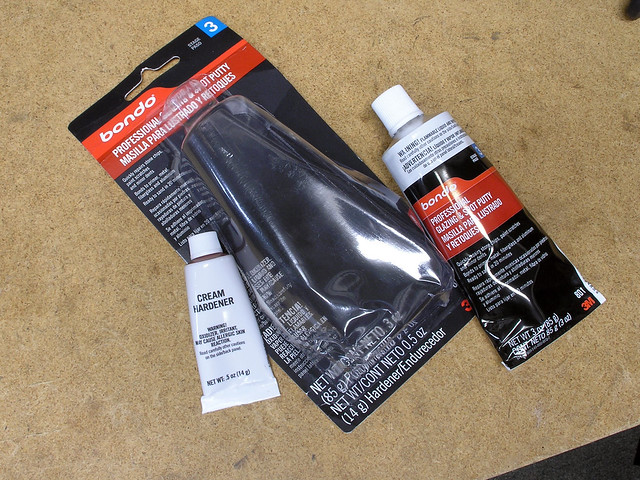
I just picked this up at the corner auto parts store:


I can't quite make out what it says under the bottom edge of the plastic. Is this Polyester catylized putty?
If it is, is way less expensive to buy the Evercoat in pint metal cans. I took a pic of it few years back. I'll see if I can find it.

Here's the Evercoat. excellent for filling pin holes in plastic body fillers (Bondo) and small door dings.
My rockets are too small to warrent the use, but it will be used on bigger builds when I get there.
You can tell there is a 1lb difference in weight between the two. Euro is much creamier than the Glazing Putty.

attachment.php
 
Last edited:
You can actually do fiberglass with Titebond instead of epoxy. May not be as strong, and not waterproof, but still impressive.


I bet you can't do a very big piece at once unless you thin the Titebond with water first.
Titebond (for the lack of a better term) flashed too quickly and skins over. Going over a skimmed over area = chuncks, not good.
 
I bet you can't do a very big piece at once unless you thin the Titebond with water first.
Titebond (for the lack of a better term) flashed too quickly and skins over. Going over a skimmed over area = chuncks, not good.

This was a mix with chopped fibers, yeah cloth layup would be a problem. This was to make a U piece for ejection gases from sections of rocket tubing. Seemed about as hard as porcelain, lightweight, and worked.
 
The photo is indeed the 2-part Bondo filler, based on a filled polyester resin and a little tube of catalyst. It's been around for decades. Not at all the same thing as the "spot putty" or lacquer putty that cures by solvent evaporation, and not the same uses. I use the 2-part Bondo on bigger models where I've done some fiberglassing. It has density, sanding qualities and toughness similar to a decent epoxy (West etc.) so is a good match for filler work. The working time is *really* short, just a couple of minutes. However, the 2-part takes a while to be really sandable...though it claims on the package that it can be sanded in a half hour or so, in reality I let it cure for a couple of days before going at it with #80-120 3M purple sandpaper. Power sanding is really helpful (try a Dremel Multi-Max). I'd not even think about trying to use the 2-part for tube spirals...the 1-part spot putty is much better for that.
 
I just went out and bought a tube of the same stuff, but no hardener necessary.

A little confusing.
 
I just went out and bought a tube of the same stuff, but no hardener necessary.

A little confusing.

You might compare the stock numbers. No way it is the same thing without the hardener or it would never cure.
I think Bondo has a different single part solvent based spot putty that comes in a very similar package and similar looking squeeze tube.

If the part numbers are the same and your package actually has the molded area for the hardener and it is simply missing. you will have to get some hardener.
 
Last edited:
Back
Top