3" min dia rocket

The Rocketry Forum

Help Support The Rocketry Forum:

This site may earn a commission from merchant affiliate links, including eBay, Amazon, and others.
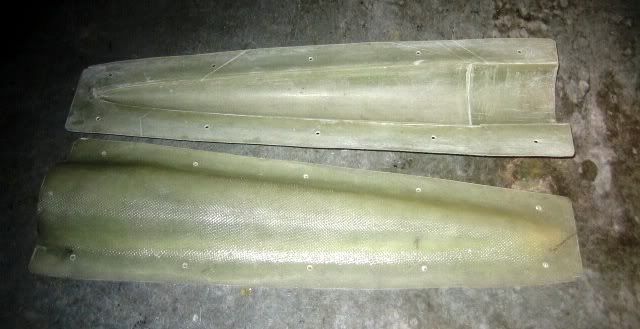
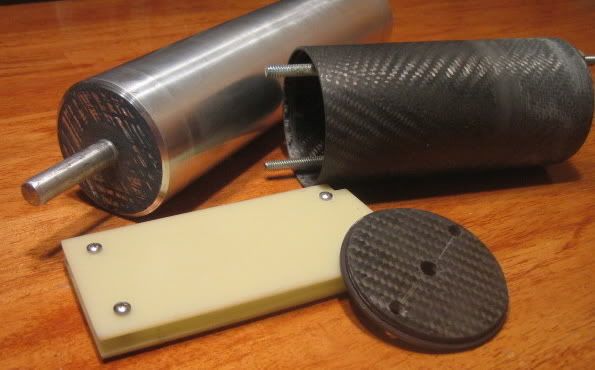
Chris, The reason I use Mahogany is that is what my wood shop buddy has lots of. Anywood will work as long as it's easy to finish. Here is a photo of the finished mold halves.
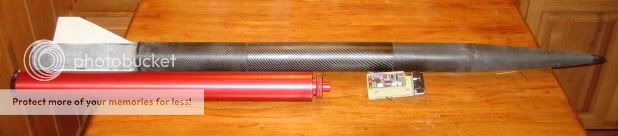
moldhalves.jpg
 
Right on....
That's pretty much what I thought.
I am a bit curious though, if you don't mind my asking yet more novice questions. In the last procedure, (glassing of the exposed half) "Was the PVA used again to prevent the halves from adhering together?"
I also noticed that the pilot holes were drilled after both halves were completed. This, I would guess is when you set alignment of the halves, correct?
Will glue and clamp up my Poplar today.
Gonna start turning tomorrow........
Much obliged~~~~~~~~~~~~~>>====>
-Chris
 
Chris, Yes is PVA used on the back half of the mold oonce the 'parting board' has been removed. Both on the blank and on the bare fiberglass flat areas. Also you need to remove any clay that may have stuck to the nose cone blank. Once both halves have been glassed. cut the mold to size, drill the alingment holes and then use a couple of screw drivers to seperate the mold.
Tony
 
I know its off topic, but how did the "to100k" project turn out? Did it fly? Will it fly soon? That is a really cool project and I would love to know how it ended.
 
I think they had three of them auger into the ground. As far as I know there is no current plan to fly again in the near future.
 
Geoff's right 3 failed flights. The first flight was an 2 EX Wimpy Reds M1550 to an L1000. Both motors worked..(my part)..booster recovered no damage, sustainer lake staked total loss. Second flight. AT M1939 to Ellis M1000. I was not there but sustainer total loss. Third flight Cesaroni O5100 to M1000. Sustainer folded right after motor burn out. Booster recovered no damage..sustainer major damage. We still have boosters but no more sustainers. There is talk about giving it another try..but I'm not sure it wil.
Tony
Wimpy Red M1550 to L1000
photo219.jpg

O-5100 to M1000
O-5100.jpg
 
I think there is some redemption floating in the air. I think you should give it one more try. I know it costs a lot to do it, but you have to redeem yourself some way.:D
 
Geoff's right 3 failed flights. The first flight was an 2 EX Wimpy Reds M1550 to an L1000. Both motors worked..(my part)..booster recovered no damage, sustainer lake staked total loss. Second flight. AT M1939 to Ellis M1000. I was not there but sustainer total loss. Third flight Cesaroni O5100 to M1000. Sustainer folded right after motor burn out. Booster recovered no damage..sustainer major damage. We still have boosters but no more sustainers. There is talk about giving it another try..but I'm not sure it wil.
Tony
Wimpy Red M1550 to L1000
photo219.jpg

O-5100 to M1000
O-5100.jpg
Tony,

I thought the first flight at Aeronauts in 2005 was an M2000 Redline to an Ellis M1000. That's what at least I remember hearing.
 
Aaron, I just checked my notes and the first flight was at Aeronaut 2005. And the motors were Wimpy Red M1993 to a L991. I was close on the motor desingnators. Not bad, for me, for off the top of my head. We wanted a cheap low altitude test flight.

Ian, As for another shot at it..there has been talk but..that's all its been so far.

Tony
 
OK..back to the rocket. I got the mold done and was able to layup a nose cone. The way I do it is one layer of cabon fiber..for looks..and then the rest is fiberglass. I have tried to make them all carbon fiber but can't seem to get them to come out as nice as I would like. I think the carbon fiber is stiffer then the glass I use. So the first layer is carbon fiber. It's layed in, in two pieces. From the shoulder out and the second one from the shoulder back they over lay each other about an inch and I use some cut up carbon to aid in making the bridge between the shoulder and the rest of the nose cone. This is allowed to get to the rubber state and then the edges are trimmed. Then 4 layers of 6oz glass is applied. I use black dye in the epoxy to make it look more like 100% carbon fiber. You can see the shape that the fiberglass is cut into to fit the mold. 6oz glass is easy to form to the shape of the mold. The green thing in the middle is a shock cord attachment point that goes up into the tip of the nose cone once the halves are joined.
nose8.jpg

You can see in the next photo how I run the glass long on the left side of the mold. This is a wet layed up. Some guys join the halves after the epoxy hardens..but I don't feel that is as strong as a wet layup.
mold7.jpg

You can see once the two halves are ready to be joined you now have 'extra' material for each seam. The two halves are kind of 'clam shelled' together and the alingment bolts are put in place.
mold10.jpg

I use the nose cone for my main parachute. It used to be kind of a rough finish inside, until I started using peel ply and a ballon to smooth thing out inside the cone. It also aids in getting everything nice and wet inside. Like the dry spots of glass in the other photo. That is surgical tubing with a ballon tied to it so that I could start inflating the ballon down near the tip of the nose cone. By this time the shock cord mount is already in place.
mold11.jpg

I let it sit for almost a day before I remove it from the mold. Here is the finshed nose cone test fitted to a piece of the body tube.
Nose9.jpg

Tony
 
Wow.....that is awesome.....

Would you say that it is easier to start using a larger cone ( e.g 54mm ) rather than a smaller one ( e.g. 38mm) using this method? It just seems like it would be more difficult to get the glass to lay flat inside a smaller cone....

Anyway, it looks great! Can't wait to see it finished.....

Ethan
 
Ethan, I have molds from 29,, to 5". The molds are easier and cheaper to make on the small cones. But the bigger cones are easier to layup.

Pat ..Thanks

The next step is to turn a mandrel for the coupler. I think I'm going to go with 7 wraps of carbon.
Tony
 
I've had to work a bunch these past few days. I did get the mandrel turned and the coupler/electronics bay layed up. I had to turn the OD slighly to get it to fit. I also got the body tubes cut to length. The rocket looks like it will be 62" long.
Tony
 
Wow nice cone. I am really enjoying the thread,please keep up the GREAT work!

Mike
 
Here is the coupler mandrel and the almost finished coupler/electronics bay. I made the manrel slightly smaller then needed. This allowed me to adjust the final size. depending on the thickness of the mylar I used .002 or .005 and then number of layers used. I wanted 7 layers of carbon, so I did some math and figured I needed 3 layers of 2 mil mylar. It worked out slightly larger OD then what I needed and turned down later to fit. The roughed up look on the one end is the end that will get glued in later. The ends to the electronics bay are G10 with a layer of carbon. The electronics board is two pieces of G10 held apart by stand offs and the 1/4 all thread slides between the two and also serves as the attachement points for the shock cord. Now I just need to fighure out how to get an ARTS, G-Wiz, 3- 9volts and switches in there!
coupler.jpg
 
I've had a couple of people ask about the nose cone design. Attached is the 'excel spread sheet' in txt format. I just got it and have no idea how it works. But this is what they have been using to come up with the various nose cone desgns.
Tony
 
I was able to get the fins cut out and prepped. The fin on the left has the leading and trailing edges beveled. The next fin has been sanded with a plam sander and 36 gritt. And the last one has been roughed up even more with a sawzal blade. The body tube has also been roughed up with 36 gritt and saw blade.
sfins.jpg

Hope fully I'll get the fins tacked on today. In the past I've used the "measure and eye ball technique" to keep the fins straight and true. I did a search and found a cool 'tool'. https://www.payloadbay.com/index.php?page=Tools&action=FINGUIDES It does not allow for input of custom body tube diameters but it should work better the what I've been doing. I just glued them to some card board and cut them out.
Tony
 
I don't understand about it not allowing custom tub diameters. Just type the numbers in when the inch or mm buttons are clicked. Unless it only prints standard diameter tubes, I haven't tried it with custom diameters.
 
I don't understand about it not allowing custom tub diameters. Just type the numbers in when the inch or mm buttons are clicked. Unless it only prints standard diameter tubes, I haven't tried it with custom diameters.

I was thinking the same thing :confused:

Ben
 
You guys are right. I did have to allow pop ups. At work where I printed them up. It would not take or do anything, unless I chose a BT off the list. Must be one othe super gobment computer fire wall things they have at work. Thanks!
Tony
 
At least you can get to the site from work. Where I'm at we have one internet connected terminal for four of us. There are so many firewalls and VPNs that it's not much faster then dialup. We usually get on once a day to check mail, do our time cards and then log off and let it collect dust.
 
Our 'productivity' at work has gone way down hill since we got computers. We spend a lot of time on them, surfin the net. Another guy and I, are almost done 'reading' the entire internet.
I did get the fins tacked on yesterday. I also had a chance to weigh the rocket. I loaded up all the parts, chute, cords, electronics etc. Less motor and fin to fin layup it came out at 4.75 pounds. Not bad for a 3" rocket and it's only 61.5" long
3together.jpg
 
Another guy and I, are almost done 'reading' the entire internet.
3together.jpg

I have done this already, I'd tell ya the ending but I don't want to spoil it for ya! ;)

Rocket is looking GREAT! I can't wait for the flight report. And if ya ever get bored and feel like making some more of those nose cones I know someone that would love to have one :)


Please keep-up the great work!!


Mike:D
 
COOL Build

What size is the Dr.Rocket case you are using and motor will you burn?????

Snoman
 
I believe its a 75/6400 and he is burning the M650W moon burner... 9 second's of white lightning! In my opinion you know a rockets high performance when it can go supersonic on a long burn motor, and I am sure this does that and more!
 
It looks so stubby!

Seriously, it amazes me how very, very short you keep your rockets Tony.
No wasted space there...

Ethan
 
Back
Top