OddRoc

The Rocketry Forum

Help Support The Rocketry Forum:

This site may earn a commission from merchant affiliate links, including eBay, Amazon, and others.

Handeman

Well-Known Member
TRF Supporter
Joined
Jan 18, 2009
Messages
9,126
Reaction score
1,942
Location
Stafford, VA
Here's a build thread for my OddRoc. I call it the "Funny Funnel.

I was in Wally World and saw the funnel and thought, I can make that fly!

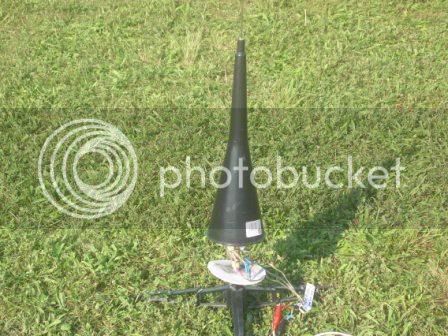
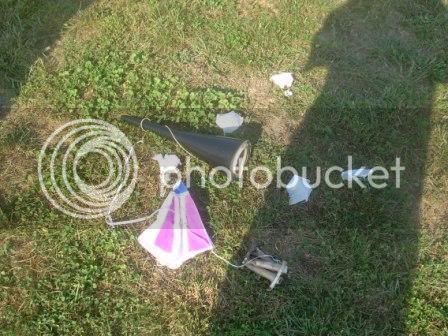
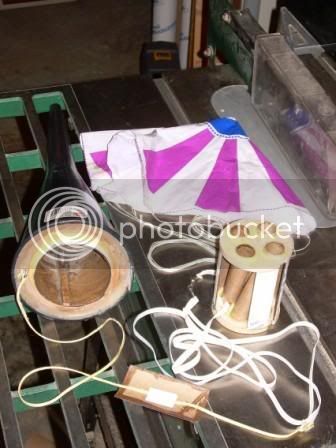
Any way, the theory is, put an engine mount holder in place. The launch rod goes through the center. The engine mount will kick out with ejection and pull the chute out with it. BTW, it will be a 3 or 4 engine cluster, probably 24mm.

Anyway, here's a couple of pics as I get started.

Just to warn you, this may take a while as I try to find time to continue/finish my "projects".

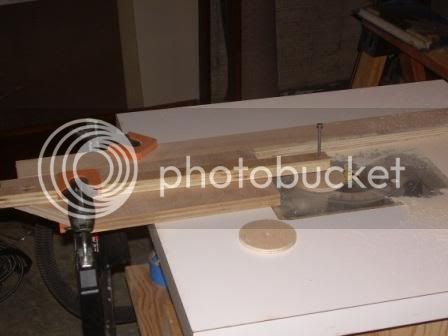
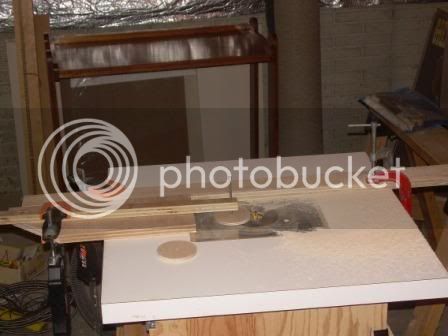
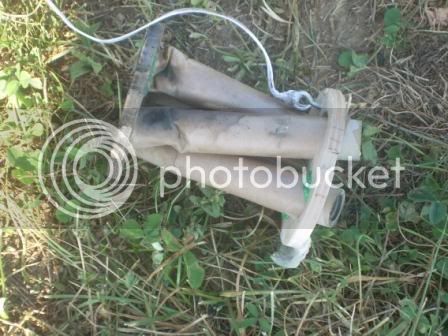
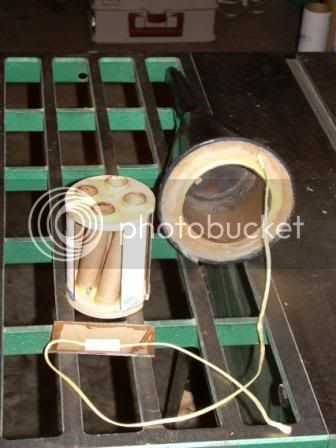
The funnel and motor mount holder.

Funny&


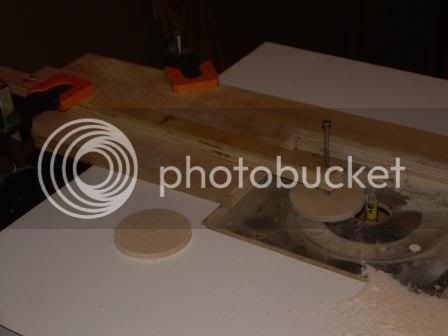
The MM holder in the funnel. The tube on the side will be used as the central launch lug.

FunnyFunnel002.jpg


.
 
Very creative. I've seen plastic funnels used as fins, but never used as the airframe for the rocket itself. This should be a fun flyer.:D
 
Hope so. I'm looking forward to trying it. I just hope the three engine cluster doesn't lower the CG too far and make it dance all over the sky. I'm thinking three B6-4s might work OK, but I'm wondering if I can push it to 4 D12-5s.

The nice part is that the motor mount will kick out, so I can build multiple motor mounts. If one doesn't work, I'll try another.
 
I'm looking forward to seeing this fly as a cluster.:D
 
A little more on Funny Funnel

I had a long plastic tube I'm using as the centerline launch lug. Here I'm gluing it to the forward bulkhead of the motor can holder.:confused:

Not sure want to call things on this one. Should get a little more clear as I go along.

Funny&
 
very cool, i never would have thought about making a rocket from a funnel :)
 
I needed Centering Rings for the motor can that slips inside the motor can holder. They need to have a center hole that the launch lug can go through and four holes for 24mm MMTs.

I decided to cut the final dimension with the router. Here's some pics of the jig/fixture I set up.

The long piece has a 16p nail through it with the point ground down flat so it can sit almost flush to the table top. It is clamped to a large piece of 3/4" ply as a carrier.
CR001.jpg


The carrier can move back and forth along the guide, allowing me to control where and how much material can be taken off.

CR002.jpg


The red C-clamp is holding down a piece of ply used as a stop for the carrier. It is clamped along the front of the guide. This is what actually sets the radius/diameter of the CR by preventing the carrier from getting too close to the router. A note here, you do need to keep the carrier flush to the guide.
CR003.jpg


This worked quite well and gave me very accurate CRs.

A couple words of warning. Unlike my pictures, set the router to be just high enough to cut the CR. Any extra height is just a little more you could get your finger against. That would be bad!

The second thing is cut the CR out first so it is just larger then the finished size. Use the router to cut it down to it's final dimension. The more material you try to take off, the more the tool tends to bite and grab the CR. That is also bad. I was using 1/4" ply, I'm sure thicker CR will tend to grab more.


I'm sure there are better and safer ways of doing this, but this did work quit well for me. If you decide to setup something similar, just be safe.
 
Handeman:
I stack cut and sand mine on a similar contraption clamped to my vertical belt sander.
Usually thy to do 10 to 12 of different materials and thicknesses at a time, all double face masking taped together in a single stack, held with a center pin much like you've done.
Sure makes getting the OD consistant anyway, but ya still have to watch your knuckles:)
After a little while you have a selection of pre-made CR's in just about any OD/ID combination you need.
 
Cool project.

Reminds me of this one, done with a similar funnel. I used a 24mm mount. On the second or third flight the ejection charge pushed the aft centering ring out of the rocket (I had a hard time getting a good bond to the plastic they use to make these funnels).

I rebuilt it with a 29 mm motor mount and had a couple more good flights with it with econojet motors. It is shown here next to an Estes Black Brant for scale.

Have fun. I think your project will be really cool.
 
Originally posted by Micromeister
Handeman:
I stack cut and sand mine on a similar contraption clamped to my vertical belt sander.
Usually thy to do 10 to 12 of different materials and thicknesses at a time, all double face masking taped together in a single stack, held with a center pin much like you've done.
Sure makes getting the OD consistant anyway, but ya still have to watch your knuckles:)
After a little while you have a selection of pre-made CR's in just about any OD/ID combination you need.

Thanks for the comment, I never thought of taping them together and doing multiples at the same time. I don't think I can do 10 or 12 on the router, but 2 or 3 would still cut down on time.

Thanks ..
 
Originally posted by spacecadet
Looks like my kind of project.
What on earth needed that shape of funnel?
Incidentally, my OH built this one https://www.northstarrocketry.org.uk/irw/03/otherrockets/cnv00040.html
in 2003. Only a nose cone, but another funnel-related rocket.

Cool, looks like baked beans and tuna fish! Was the funnel lighted inside or was that just a trick of the light in the photo?

What size motors did you fly it on?
 
Originally posted by Afterburner
Cool project.

Reminds me of this one, done with a similar funnel. I used a 24mm mount. On the second or third flight the ejection charge pushed the aft centering ring out of the rocket (I had a hard time getting a good bond to the plastic they use to make these funnels).

I rebuilt it with a 29 mm motor mount and had a couple more good flights with it with econojet motors. It is shown here next to an Estes Black Brant for scale.

Have fun. I think your project will be really cool.

That looks like the same funnel I have.

I never thought of adding anything on top. I guess the center launch lug sort of eliminated that, but that looks really cool:D

Just for future reference, how did you do the launch lug?
 
Originally posted by spacecadet
Looks like my kind of project.
What on earth needed that shape of funnel?
It's for transmission fluid. Some vehicles have the fill tube short and way down behind the engine.
 
And to think Iv'e been doing C.R.'s on the lathe all these years!!:rolleyes: Boy is my face red!:eek:
Excellent use of the router table Handeman. Great fixturing as well.
Thanks for the tip.....
 
Originally posted by Rocketjunkie
It's for transmission fluid. Some vehicles have the fill tube short and way down behind the engine.

That would certainly fit with the size of tranny fluid fill tubes.

I didn't pay much attention. I just saw two of them on the shelf at Wally World and grabbed one.
 
Been building some more on the Funny Funnel.

I realize that this would almost certainly be unstable as far as CP/CG goes. I decided that since it has a central launch lug, using spin stabilization should work quite well since it can get spinning well before leaving the launch rod.

Here's a pic of the funnel with the motor mount assembly.

FFmotormount.jpg
 
The next thing I needed was to glue a hardwood strip into the motor mount holder and notch the motor mount so it wouldn't spin inside the funnel.

Here's a pic of the motor mount with kevlar and elastic shock cords.

BTW, the green on the motor mount is some Xmas tissue paper I soaked with glue to fill the gaps.
FFMMshockcord.jpg


Here's another on with the motor mount in place.
It's DONE!!!! :beer:

FunnyFunnel.jpg


I got the launcher battery on the charger and plan to try it out today. More pics coming.
 
Very cool project. Looking forward to the launch pics!

G
 
That thing's a monster! That's a great idea for spin stabilization.
 
I got out this morning and lauched the Funny Funnel! :D

The UP was excellent All four motors lit. :D

The DOWN wasn't so good :(

Here's a few pics


Igniters in 4 motors twisted together and connected with a 3 pair clip whip.
Ignitershookedup.jpg


On the pad
Onthepad1stflight.jpg


Ready on the button
Readyonthebutton.jpg


The landing
Crash1stflight.jpg


Remains of motor mount
Crashmotormount1stflight.jpg


.
 
Here's a movie of the flight that my son took. He was a little behind on the flight so you get a good look at the smoke trail and the descent.


The spin stabilization worked well. There was one corkscrew about half way up. It was a little wobbly but generally pretty straight up. I think that part of the concept was proven pretty well.

It would definitely be unstable without the spin as the descent showed, it came down tail first. A little more spin might be better since it seemed to get pretty squirrely when the motors burned out.

I used three C6-7s and one C6-5. I heard at least 3 ejection charges, but the motor mount never ejected so there was no chute.

Looking at the aftermath, the motor mount came about 1 1/2" out and stuck. The remaining charges didn't push it any further. Coming in tail first, it landed on the motor mount, which took all the damage.

The chute and shock cord were wrapped in the wadding sheets that came in the pack of C6-7 motors. The chute didn't have any damage, but all but one shroud line was melted off and there were two spots on the elastic shock cord that are worse for wear. I don't know if the recovery damage was caused by the initial ejection charge, but I suspect most of it was from the subsequent charges.

Back to the drawing board.

I'll update when I try again.
 
"The next thing I needed was to glue a hardwood strip into the motor mount holder and notch the motor mount so it wouldn't spin inside the funnel."

I think the above is what kept the mounter mount from ejecting. Perhaps if you ran a similar motor mount, but had one vertical core motor mount also. Then use plugged motors for all but the core motor mount. That way the mount won't try to twist/spin upon ejection.

Just an idea.

That's a good idea.
 
I can't use a core motor because the launch rod goes right through the center.

I think what I need is four supports on the out side edges of the motor mount so it can't get cocked in the MM holder and is forced straight out. I could use a large tube for the outside of motor mount but then I wouldn't have any place for the chute.
 
The down part wasn't a total failure...so far as I could tell you hit no cars or small children. :shot:

Sorry 'bout that.
 
The down part wasn't a total failure...so far as I could tell you hit no cars or small children. :shot:

Sorry 'bout that.

That is true. That was also why I launched early on a Sunday morning. No one around.

I also used a 50 foot wire from the launch controller to the pad. My hide has a little value too, at least to me.:)
 
Well, I finally got around to building a new motor mount for the Funny Funnel.

It sure is a lot easier the second time around. This time I glued some balsa strips on the inside edge of the top and bottom plates. The tube was then glued to these strips.
I guess if I had made the two plates a little smaller I could have just glued them inside the tube, but that's for the third try, if it's need.

Anyway, here's a pic of the new motor mount.

The piece of tubing attached to the kevlar shock cord has been strengthen with CA around all the edges. It is there to help make a smoother ejection and to protect the chute and shock cord from the hot gases.

FunnyFunnelrepairedMMm001.jpg


Here's a pic of the new motor mount and the complete recovery system. I'm using a 24" chute.

FunnyFunnelrepairedMM003.jpg
 

Latest posts

Back
Top