White Sands V-2 #3

The Rocketry Forum

Help Support The Rocketry Forum:

This site may earn a commission from merchant affiliate links, including eBay, Amazon, and others.

paulk

Well-Known Member
Joined
Oct 19, 2005
Messages
832
Reaction score
0
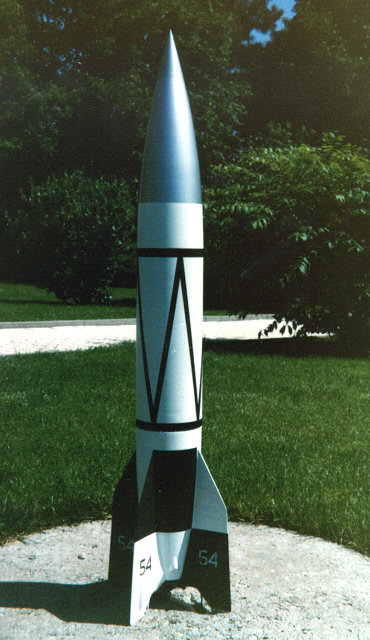
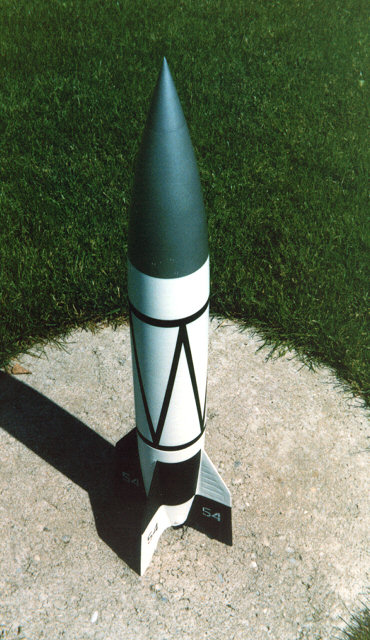
Hi, I recently finished my first V-2, using the paint scheme from the White Sands #3 launch. Our club has an upcoming V-2 mass launch, so that was a great excuse to build one. I started with a Canadian Arrow kit. Wanting it to be as close to scale as I could with this kit, I took 4.75" off the body tube, and just a tad more than 0.5" off the outside edge of the fins. I worked off Peter Alway drawings for scaling. This gives me a 1:25 scale, 22" tall, 2.6" diameter bird. I put bevels on the fins, though I didn't do any further fin detail, I'll save that for my next one.

Wanting to try that new Apogee fix-it epoxy clay (realizing it is overkill for this build), I made epoxy fillets. I still had to do a bit of wood filler to get smooth fillets, I couldn't get the epoxy as smooth as I wanted. The original CA kit comes with 0.5 oz of nose clay, I put in 1.0 oz. I still need to do a swing test to see if this is enough. Weight without engine comes in at 6.9 oz. I'd really like to fly this with an AT D9 motor, to get a slower liftoff, but I'll try it on a D12-3 first, then maybe an AT E18. With the smaller fins, stability is a concern.

Paint is standard Krylon, I love that stuff. I used the paint scheme shown on www.postwarv2.com. This was a fairly straightforward masking job. Seemed downright easy after doing the Saturn 1B. Mr. Beggs has a real nice site for V-2 info. Decals are from excelsior, they went on great, as usual.

Well, enough talking, here are some pictures of the finished product. :)
 
A view between fins 3 & 4, showing the pinup detail, which was only on this particular V-2. Funny that the V-2 in this detail is closer to the paint scheme from White Sands V-2 #2, though not identical.
 
And finally, a color photo of the real White Sands #3 V-2. Notice that the pinup detail does not show up, but it does show up on the B&W smithsonian photos. I think this particular photo was some sort of publicity photo, and appears as though it was doctored to hide the pinup detail.

Geez, this scale stuff could get addictive, just what I need :D
 
Originally posted by paulk
Weight without engine comes in at 6.9 oz. I'd really like to fly this with an AT D9 motor, to get a slower liftoff, but I'll try it on a D12-3 first, then maybe an AT E18. With the smaller fins, stability is a concern.


Nice V2!
I don't know if I would use a D9, I don't think it would have enough speed off the rod for safe flight with that big diameter rocket.
The D12 will be slow enough.
Go with the E18 you won't be sorry! :D
 
Very Nice Paulk:
I have a friend in the club Paul Miller who is a V-2 fanatic, he has V-2s in just about ever scale you an imagine, and was attempting to build at least one of all the vairents:)
Very nice job on your varient:) It's a shame you couldn't fine one of the old 2.6" estes scale kits as a starting point... May be Pauls fault I think he bought and horded ever 2.6" V-2 estes kit he could find LOL
I have a couple also but he's the man on them. even has a german version on a scratch built rail car and support equip car. I think I have a pic of that one.
 
Oh by the way I have one with Plywood fins and a nylon parachute and was able to launch with a E9-4 it did cock a little after leaving the rail but it flew nice and high.


Mark
 
Nice job Paul! I'm trying to decide what scheme to put on my CA to V2 conversion. Last night i shot it with a coat of white but I sure do like the yellow.

Thanks for the link too. Awesome ref site!
 
Paul,

Your V2 looks great. I like the decals you did. I built the old Estes 4" V2 about 6 months ago. I bought this model at Hobby Lobby a few years ago when they were doing their half-price coupons. It sat in my closet until 6 months ago when I finally decided to build it. The vacuum form fins that came in the kit look nice, but they were very difficult to work with.

I decided to paint it with the paint scheme from the #2 test launch. Here's a picture of it sitting in my back yard.

https://tinyurl.com/2z2lyw

Dave
 
Very Nice V2 Dave.

My old 2.6" Estes V2 was done in the Bumper colors and strip pattern, but It'll never fly again. At one of the NARAM's one of the "fun Events" was V2 Spot landing.
Flying the old girl on a D12-3 i was lucky enough to win the event....but the best part is I got both Vern Estes and G. Harry Stine to autographic the model:D It's now a treasured keepsake:) I've gotta take a better photo of it showing the signatures.
 
nice job !,
I also did the CA- bash into #3,
I didn't change the fins and it flys great on a C11
I thought the excelsior decals came with the lower vent band?
mabey it's the bigger version.

post a launch pic if you can !
 
I did a V2-#2 in micro powered @ 1:119 scale though about doing #3 for the moon sitting decal but decided we wouldn't be able to see it so went with a slightly simplier paint scheme:)
 
Very very nice Paul!

That color scheme is seldom used as reference.

Here is mine that is proudly displayed in the Hermann-Oberth-Museum:

lost_V2_1.jpg


lost_V2_3.jpg


Round #54 was referred to as "Sir Launchalot" because it took several trys to get it lit!
It finally wound up only going a few kilometers high and then exploded!
 
Beautiful V2. Every serious model rocket enthusiast should have a V2 in their collection, in my opinion.

I have at least 4 different versions myself.
 
Thanks for the compliments guys :blush: . Styme, these V-2 decals don't come with the vent band, though I think some silver pinstripe would look good. Launch is a couple weeks way, will post pics then. Nice 4" versions Leo & Dave, wish I could have found one of those for a reasonable price. Clive, I agree; I learned a bunch about the history of this rocket while researching paint schemes.
 
Originally posted by DaveHein
Paul,

Your V2 looks great. I like the decals you did. I built the old Estes 4" V2 about 6 months ago. I bought this model at Hobby Lobby a few years ago when they were doing their half-price coupons. It sat in my closet until 6 months ago when I finally decided to build it. The vacuum form fins that came in the kit look nice, but they were very difficult to work with.

I decided to paint it with the paint scheme from the #2 test launch. Here's a picture of it sitting in my back yard.

https://tinyurl.com/2z2lyw

Dave

Dave your pic of the V2 in your back yard is a riot! Checked out some of you're other picts from the link, Did you build a camera rocket?,what kind of camera? details! ,looks like you may have flown it on a Kite at the beach?

More Picts Please!

Steve M:D :)
 
Originally posted by mccr3328
Did you build a camera rocket?,what kind of camera? details! ,looks like you may have flown it on a Kite at the beach?

I have built two camera rockets. They both use the Aiptek mini PenCam, which is available from the Aiptek website for $10. I also flew one of the cameras from a kite once at South Padre Island.

My camera rockets are based on the Estes StormCaster and Executioner kits. I have modified my Executioner quite a bit so I call it the Mod X.

I have more details on these rockets on my rocket page at https://home.swbell.net/davehein/rockets.html
Click on the pictures of the rockets to get more information. Click on the launch log for the Mod X rocket to view its pictures.

Dave
 
Back
Top