Big Daddy 29mm Build Thread

The Rocketry Forum

Help Support The Rocketry Forum:

This site may earn a commission from merchant affiliate links, including eBay, Amazon, and others.

DAllen

Well-Known Member
Joined
Jan 17, 2009
Messages
6,239
Reaction score
3,226
Location
SW Michigan
Warning: This build thread contains a Big Daddy modification that has probably been done about 132,571 times already. Should you feel the temptation to post a reply with, “This is BORING and has been done already” or some other snide remark like that then please hit the “back” button on your browser immediately. Everyone else, read on…

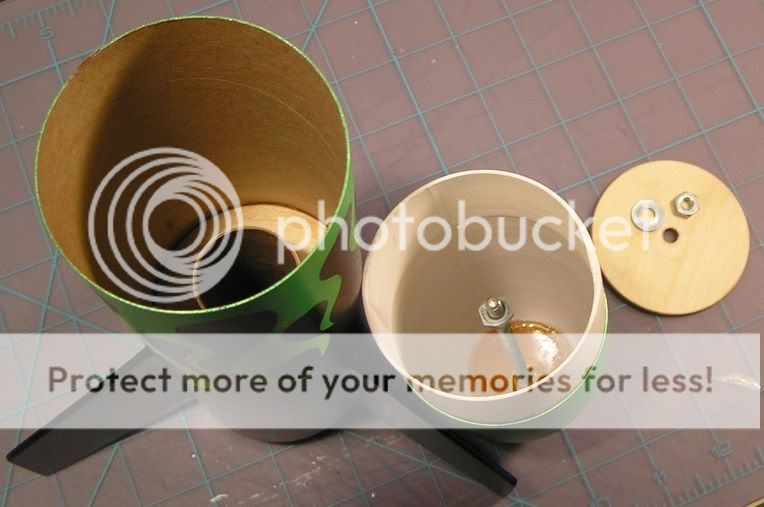
Big Daddy + 29mm MMT = :D

This is an old style BD I ran across for $15 which sure beats the heck out of the regular retail price of $30 (?) or whatever it is. So first up, the MMT. I am using 30 min epoxy because that’s what I have in the house and a 6/32 threaded rod for my positive motor retention. Everything will get a good dose of epoxy.
 
Next up are the launch lugs. I wanted to push the lugs as far apart as possible on the body tube cause I think it looks cool. This picture shows how I lined them up. I’ve done this before with success.

More coming soon...My deadline is Nov. 4 because that's the big ole' Team 1 Launch in Three Oaks so I gotta make it with this bird.
 
I'll be watching this build. I've got the parts set aside to do a 29mm BD in the near future. And, a 3x24mm cluster too.
 
Please excuse my ignorance but that screw with the wing nut; you mention that is a positive motor retention. How does that work? Do you turn the wing nut down until it makes contact with the motor? If at some point you could illustrate via a picture what that does and how it works I would be most grateful.
 
Ah yes...Excellent question. It depends on the situation. If it's going to just be my 29mm RMS casing then I put a wide washer under that wing nut and screw that onto the motor. If I use my 29mm to 24mm motor adapter to say launch on an E9 then I use some screen door clips that sort of hook onto the lip of the motor.

This is a proven method. I have NEVER lost a casing or motor using this method of retention. I've probably used this about 2 dozen times with motors ranging from Estes D's to AT G's.

When I get a little further along I'll post some pics so it'll make a little more sense.

-DAllen
 
Big Daddy mods are NEVER boring IMO. :D

are you upgrading to ply fins??

can't wait for this thread to progress!
 
For you Rocksim heads hear is the Rocksim file. Sort of a work in progress. I'm trying to alter the weights of the components in the file to reflect what they are in the real world. Obviously, stability is a HUGE concern when doing a mod like this.

Based on my best guess for this rocket, if I load an AT F40 that means (according to Rocksim) that I need to add about 5 oz. of weight to the nose. :eek: So does anyone else here have experience with doing this mod? If so, what was the amount of nose weight that really had to be added to maintain 3" between CP and CG?

To answer the question...No I won't be switching out to plywood fins but I will however, glass the fins tip to tip. What is the speed of glassed balsa anyways?

-DAllen
 
After seening the next few pics everyone is going to think I am nuts. But I thought I would try some different things. I have 2 extra BD noses so if I screw this up no big deal.

This photo is of the dowel rod I used to mount the eyelet to. I was going to do this with threaded rod sleeved to an eyebolt but that didn't work out. I don't trust the little loop Estes provides on the side of the N/C considering the type of shock cord I am using. Anyways the rod will be inserted into the N/C and epoxy poured around it. I cut tiny little notches out on the side so the expoy would have a little something to grab to.
 
And here is a view inside the N/C with the dowel in place. I cut a large hole in the base of the N/C to make it easier to dump nose weight and epoxy in there as needed.
 
Here is the inside of the body tude with the shock cord mount on the centering ring ready to be epoxied to the tube.
 
BTW 2 part exapandable foam works well to keep the nose weight in place. Just fill the nose cone up after the weight and epoxy have set up. Use foam from PML or Giant Leap. Some of the hardware store stuff won't set-up properly in a nose cone.


Al
BRS Pres
 
Big Daddy is fun to mod,
If you can substitute the nosecone dowel for a small threaded rod you will have the basis for an adjustable noseweight system.

Than you could use the end of the rod to also screw on a female eyebolt. allows the rocket to fly on nearly anything that will fit.


heres an example.

 
Rocksim and Spacecad both seem to want alot of nose weight for short fat rockets. If you haven't commited to nose weight on your model, you may want to set it up to change the weight via washers or something.

My 29mm Fat Boy has 2oz of nose weight and flies perfect. I can't remember what Spacecad came up with. I need to get my copy of Rocksim updated. V5 is showing it's age. I have been told that a FatBoy 29 will fly fine with no added nose weight, but I like to be cautious and get my reload cases back in good condition.

My Big Daddy is still in it's wrapper. I am thinking of setting it up for a 24mm AT reload case. The local field has too many trees to go too high with the rockets. The HPR site I only get to a couple of times a year.

So far the build is looking good. Are you applying a custom paint job or going with the stock scheme?
 
I have been told that a FatBoy 29 will fly fine with no added nose weight, but I like to be cautious and get my reload cases back in good condition.

This is generaly true of a short squat rocket like the fatboy or bigdaddy. however there is an optimum weight for every different rocket/motor combo. ( for example: compare throwing a rock, to throwing a feather.)

so while stability is very important it's not the only factor one should concentrate on when designing a rocket with such a high power to size ratio.especially if you plan to fly several different motors.
(this is where an adjustable nose weight comes in handy.)

in a nutshell,
there is no one correct answer to "what is the proper noseweight for a 29mm bigdaddy/fatboy?"
 
Originally posted by Saks_Russel
Rocksim and Spacecad both seem to want alot of nose weight for short fat rockets. If you haven't commited to nose weight on your model, you may want to set it up to change the weight via washers or something.

My 29mm Fat Boy has 2oz of nose weight and flies perfect. I can't remember what Spacecad came up with. I need to get my copy of Rocksim updated. V5 is showing it's age. I have been told that a FatBoy 29 will fly fine with no added nose weight, but I like to be cautious and get my reload cases back in good condition.

My Big Daddy is still in it's wrapper. I am thinking of setting it up for a 24mm AT reload case. The local field has too many trees to go too high with the rockets. The HPR site I only get to a couple of times a year.

So far the build is looking good. Are you applying a custom paint job or going with the stock scheme?

For reference, I flew my Big Daddy (newer E version) on a 24mm AT RMS E11-J and it was fine with no nose weight. It flies pretty darn good.

I think a 29mm version would be pretty sweet too. I like the adjustable nose weight ideas mentioned so far.

Sandy.
 
Originally posted by stymye
This is generaly true of a short squat rocket like the fatboy or bigdaddy. however there is an optimum weight for every different rocket/motor combo. ( for example: compare throwing a rock, to throwing a feather.)

so while stability is very important it's not the only factor one should concentrate on when designing a rocket with such a high power to size ratio.especially if you plan to fly several different motors.
(this is where an adjustable nose weight comes in handy.)

in a nutshell,
there is no one correct answer to "what is the proper noseweight for a 29mm bigdaddy/fatboy?"

I agree. I have had problems with heavy nose cones breaking open like an egg on recovery. My initial Fatboy mod with 3x E9's used the amount of weight that Spacecad came up with and it was very heavy. The motors charred the aft end of the rocket pretty bad (slow acceleration?) and the nose cone busted on landing. Great up, though. Another one had the plastic loop on the nose cone break at deployment. That nose cone came in hard and broke...no wonder. An adjustable nose weight system will probably be the best bet. An empirical approach will be the best way to come up with the best weighting. A simple altimeter will help optimize the weight. I found an altimeter for R/C stuff that is very inexpensive, <https://rcreporter.com/products.html>. Only $40.

Cheers

Ken Brown
 
If you have a scale, you could simply weigh the standard motor(1- D or E) than weigh the new motor setup (3- E motors) subtract the difference... theres your noseweight.

this is a good starting point for up-powering any stock model.quick and easy
 
Originally posted by stymye
If you have a scale, you could simply weigh the standard motor(1- D or E) than weigh the new motor setup (3- E motors) subtract the difference... theres your noseweight.

this is a good starting point for up-powering any stock model.quick and easy

While I agree that would likely work, wouldn't it usually be conservative? If the CG is exactly halfway down the rocket, then this approach would leave the CG unchanged. However, usually the CG is much further aft, in which case the amount of weight needed at the nose would be much less than the amount added at the tail depending on the location of the CG fulcrum.

When possible, find the CG of the original (either by balancing or internet lookup) then put in the biggest possible motor and add nose weight until the CG is returned to that spot.

G
 
Originally posted by stymye
Big Daddy is fun to mod,
If you can substitute the nosecone dowel for a small threaded rod you will have the basis for an adjustable noseweight system.

Than you could use the end of the rod to also screw on a female eyebolt. allows the rocket to fly on nearly anything that will fit.


heres an example.


That is EXACTLY what I was trying to do and the silly local hardware store did not have what I wanted so I got tired of looking and gave up. Sometimes I lack the patience for stuff like that. What can I say? I hate shopping. Maybe on the next bird I'll do something like that.

-DAllen
 
I think if you can't find a rod, you could use a really long bolt.just place the head of the bolt into the goop.


Originally posted by DAllen
That is EXACTLY what I was trying to do and the silly local hardware store did not have what I wanted so I got tired of looking and gave up. Sometimes I lack the patience for stuff like that. What can I say? I hate shopping. Maybe on the next bird I'll do something like that.

-DAllen
 
Originally posted by Saks_Russel
Rocksim and Spacecad both seem to want alot of nose weight for short fat rockets. If you haven't commited to nose weight on your model, you may want to set it up to change the weight via washers or something.

My 29mm Fat Boy has 2oz of nose weight and flies perfect. I can't remember what Spacecad came up with. I need to get my copy of Rocksim updated. V5 is showing it's age. I have been told that a FatBoy 29 will fly fine with no added nose weight, but I like to be cautious and get my reload cases back in good condition.

My Big Daddy is still in it's wrapper. I am thinking of setting it up for a 24mm AT reload case. The local field has too many trees to go too high with the rockets. The HPR site I only get to a couple of times a year.

So far the build is looking good. Are you applying a custom paint job or going with the stock scheme?

Paint? One word: FLAMES. I just can't decide on flat black or glossy black for the base color.

I have about 2 oz. of nose weight in currently. That's precisely how much epoxy it took for me to feel comfortable with securing the dowel in place.

I think the 24mm RMS is perfect for the stock Big Daddy. All it takes is modding the MMT a little, come up with some retention and you are good to go. I just wanted to go with the 29mm for no reason other than I can say I did it and it sounds cool.

-DAllen
 
Originally posted by CQBArms
I think if you can't find a rod, you could use a really long bolt.just place the head of the bolt into the goop.

See, I live in a small town and the local Ace Hardware isn't well stocked and didn't have something long enough to get an eyebolt down far enough so I could secure the shock cord to it. Unless I wanted to use 1/2" threaded rod, 1/2" eyebolts and 1/2" threaded unions (boy that would take care of the nose weight issue!) I just couldn't find a size rod that would work the way I wanted.

Ever try to get help for one of the employees at a place like that and then explain exactly what it's for? I usually get, "You want what for a model rocket? How big is that thing anyways?" The people at our Ace are really nice but I find their reactions to my hobby rather entertaining.

-DAllen
 
Yeah that would be a problem.
I'm lucky I live in a small town (pop 1600) but there are some larger towns nearby. If all else fails I got to the Home Despot.


Originally posted by DAllen
See, I live in a small town and the local Ace Hardware isn't well stocked and didn't have something long enough to get an eyebolt down far enough so I could secure the shock cord to it. Unless I wanted to use 1/2" threaded rod, 1/2" eyebolts and 1/2" threaded unions (boy that would take care of the nose weight issue!) I just couldn't find a size rod that would work the way I wanted.

Ever try to get help for one of the employees at a place like that and then explain exactly what it's for? I usually get, "You want what for a model rocket? How big is that thing anyways?" The people at our Ace are really nice but I find their reactions to my hobby rather entertaining.

-DAllen
 
Hi,

I also builded the Big Daddy with a 29mm motormount before but i used fiber to make the rocket stronger. A Tip, use all space in the nosecone, you will need it. And take a look on the CP/CG situation.
wwwIMG_1110.JPG

more pictures later

Kind regards from Germany, Tommy
 
DAllen,

If you can't find the parts you need, Speak up. Postage for a bit of all thread isn't much. I have a bunch of cut-offs lying around in the shop (if I have tossed them). Want some?

Ken Brown
 
Ken,

Thanks for the generous offer! Not to seem ungrateful but I think I'll pass for the time being though. I have the current issue with the nose cone solved. And I take it by your sig that you'll be going for your L2 soon? If so, good luck!

And while I'm at it to update the thread, I have the fins glassed. Eventually I'll post some pictures of it.

-DAllen
 
Originally posted by DAllen

I think the 24mm RMS is perfect for the stock Big Daddy. All it takes is modding the MMT a little, come up with some retention and you are good to go.

Yeah - I put a LOC 24mm motor tube in mine to handle the heat better, different recovery harness too. I just painted the CRs with epoxy, and also replaced the balsa fins with basswood. This thing love the WL loads for the 24mm casing!

Great build so far! You mentioned the base color for the flame job - go with the gloss black! I love shiny rockets!
 
Okay…I had an oops last night.

I glassed the fins and 3 of the 4 sections of glass went great. Apparently, on section #3 of fiber glassing my brain went AWOL and I had a colossal brain fart. I don’t know if was distracted by the world series or what but I looked at my bird this morning to find 4 LARGE blisters on that section of glass. I just wasn’t paying attention. I have removed the cancerous legions and after some light sanding smoothed things out. In order to preserve what tiny bit of TRF street cred I have scrapped together, I elected to NOT take pictures of that mess. Which is why there won’t be any photos for a bit. To fix it, I put another light layer of glass on over it. It may not finish the best but it will finish a whole lot better than any other alternative I could think of.

So to sanctify this project in the eyes of the rocket gods and atone for my egregious error I offer up a picture of my daughter. She’s the blonder one wearing pink.

Have mercy up me oh gods of the air and masters of the impulse and forgive my transgressions.

:D
 
blisters are a part of glassing, or getting used to it atleast.


your down a pic tho..
 
Back
Top