You are using an out of date browser. It may not display this or other websites correctly.
You should upgrade or use an alternative browser.
You should upgrade or use an alternative browser.
The "Cherry Bomb"- Fin Attachment
- Thread starter Aksrockets
- Start date


Help Support The Rocketry Forum:
This site may earn a commission from merchant affiliate
links, including eBay, Amazon, and others.
22 gauge works nice. You can get a whole spool army surplus for $25. It is old coms cable. We have a whole palate on post. They don't use it any more. Wish I could get it home.
qquake2k
Captain Low-N-Slow
- Joined
- Jan 26, 2010
- Messages
- 13,574
- Reaction score
- 65
I used 22ga that I bought at Radio Shack. Came in a package of three spools of different colors.
https://www.radioshack.com/product/index.jsp?productId=2049745
https://www.radioshack.com/product/index.jsp?productId=2049745
Aksrockets
Now with 8% more aluminum
- Joined
- Apr 1, 2011
- Messages
- 3,505
- Reaction score
- 14
I'll get some 22ga wire next time at radioshack. I'm going to use the stuff I have now for testing.
I have plenty of room on the sled if I want to make this redundant deployment at a later time.

Does this wiring layout look alright to everyone? I'm following the directions on Adept's site.
Alex
I have plenty of room on the sled if I want to make this redundant deployment at a later time.
Does this wiring layout look alright to everyone? I'm following the directions on Adept's site.
Alex
stealth6
insert witty tagline here
I like how you are marking "Up" and "Down" on the sled. Pretty risque in your neck of the woods, no?
Perhaps I should have a couple of nice young men in white shirts and ties ride their bikes on over to your house, pull some books/literature out of their backpacks, and sit you down for a chat, hmmmm?
s6
Perhaps I should have a couple of nice young men in white shirts and ties ride their bikes on over to your house, pull some books/literature out of their backpacks, and sit you down for a chat, hmmmm?
s6
Aksrockets
Now with 8% more aluminum
- Joined
- Apr 1, 2011
- Messages
- 3,505
- Reaction score
- 14
The AV bay is weighing in a little on the heavy side. Without batteries and wiring it's 14oz. Should not be a problem, a K will still take 'er past a mile.
Alex
Alex
Aksrockets
Now with 8% more aluminum
- Joined
- Apr 1, 2011
- Messages
- 3,505
- Reaction score
- 14
Lets get this thing back on track, shall we? Its been a few cold months so I havn't been able to fiberglass anything. Well, today it was in the high 40s, almost the 50s so I thought it would be a good day to get some FG on the upper body tube.
I cut a 25.35in x 25in square out of the fiberglass BlackBrandt got me. That was enough for 2 wraps exactly. I mounted the tube on a square peice of wood, sitting between two plastic drawers full of rocket stuff. This is my usual fiberglassing setup.

Mixed up 90ml of Resin with 18ml of hardener. That should have been enough to glass the tube and more. So far, that has been the largest amount of west system epoxy I've mixed. I mixed the epoxy thoroughly with a square of bass wood inside a metal container. This has worked well in the past.
I coated the tube using a 1in chip brush and started wrapping the fiberglass around the tube, wetting out the fiberglass as I go.

It was on my second wrap when I noticed my epoxy starting to "kick". It was only slightly warm so I ran to the kitchen and got a small container full of freezing water. I hurried to finish wetting out the fiberglass and peel ply but when I was wrapping the peel ply the epoxy was too thick to properly saturate my peel ply.

It looks awful. Not all of the peel ply is touching the fiberglass so I'm going to get a LOT of texture that would need to be filled. I'm going to get ready to break out the bondo.
I suspect the epoxy kicked because it was just too hot in my workshop. I work in a greenhouse so the temperature inside is much warmer then outside.
Well, I hope my booster tube goes more smoothly.
Alex
I cut a 25.35in x 25in square out of the fiberglass BlackBrandt got me. That was enough for 2 wraps exactly. I mounted the tube on a square peice of wood, sitting between two plastic drawers full of rocket stuff. This is my usual fiberglassing setup.
Mixed up 90ml of Resin with 18ml of hardener. That should have been enough to glass the tube and more. So far, that has been the largest amount of west system epoxy I've mixed. I mixed the epoxy thoroughly with a square of bass wood inside a metal container. This has worked well in the past.
I coated the tube using a 1in chip brush and started wrapping the fiberglass around the tube, wetting out the fiberglass as I go.
It was on my second wrap when I noticed my epoxy starting to "kick". It was only slightly warm so I ran to the kitchen and got a small container full of freezing water. I hurried to finish wetting out the fiberglass and peel ply but when I was wrapping the peel ply the epoxy was too thick to properly saturate my peel ply.
It looks awful. Not all of the peel ply is touching the fiberglass so I'm going to get a LOT of texture that would need to be filled. I'm going to get ready to break out the bondo.
I suspect the epoxy kicked because it was just too hot in my workshop. I work in a greenhouse so the temperature inside is much warmer then outside.
Well, I hope my booster tube goes more smoothly.
Alex
CarVac
Well-Known Member
- Joined
- Feb 12, 2012
- Messages
- 5,704
- Reaction score
- 37
A few tips, given my recent success with hand-wrapping tubes:
Use gloved fingers to spread epoxy on the fabric. You a) waste less epoxy, b) get more control over the amount you put down, and c) can roll your finger to work air out and epoxy in without distorting fabric. It's a lot faster and much less mess.
I guess regarding epoxy "kicking", the only advice I could offer is a) do the layup somewhere else and then move it into the greenhouse (actually a great plan for working fast!) or b) switch epoxies. A) would probably be better (cheaper and faster) unless you're gonna get into really high performance stuff that needs higher temperature resistance.
Was that 60 minute epoxy? I've never used the West systems, only US Composites. What I do is mix it in a cup, then pour it onto a paper plate when I'm using it. I hasn't gotten warm or "kicked" on my yet.
Cyril's Scribe
Well-Known Member
- Joined
- Jan 8, 2011
- Messages
- 839
- Reaction score
- 1
Since it is West Systems you can try the 206 Slow or 209 Extra Slow Hardner, if you are not already doing so. The 209 Extra Slow is specifically formulated for laying up fiberglass. It can also help to mix in smaller batches, as epoxy can experience "thermal runaway" and harden a lot faster than it should.
maxvelocity
Well-Known Member
- Joined
- May 16, 2011
- Messages
- 940
- Reaction score
- 4
Might check your mix ratio. Ive used west in my cali garage mid summer 110+ with plenry of working time. Also the shallowest container for the amount of epoxy will be best.
Tominator 2
Well-Known Member
- Joined
- Jan 23, 2009
- Messages
- 296
- Reaction score
- 0
Might check your mix ratio. Ive used west in my cali garage mid summer 110+ with plenry of working time. Also the shallowest container for the amount of epoxy will be best.
I agree with MaxV on this one.
And it isn't the best practice to be spreading epoxy with your hands even with gloves on. Way too messy/gets everywhere and not that effective. Go with just dabbing cloth with the brush.
Resource-my experience in the industry.
")
-Tom
Aksrockets
Now with 8% more aluminum
- Joined
- Apr 1, 2011
- Messages
- 3,505
- Reaction score
- 14
The fiberglass on the booster tube went much more smoothly! I used the same 2 wraps of 6oz fiberglass although this time I didn't use the fiberglass the Blackbrandt gave me. I decited to go with the standard 6oz and not the tight weave stuff. I'll use the tight weave stuff for laying up G10 sheets.

This time I put my epoxy mixing bowl in a small container of ice water. This helps control thermal runaways. The cold water keeps the epoxy from heating up and extends the epoxy's pot life. If you do this just remember to keep the water out of the epoxy!

I like to set my fiberglass and peel ply under the tube when I'm wetting it out. That way, if the epoxy drips off the tube it lands of the fiberglass and doesn't go to waste.

Here's the tube with both wraps of fiberglass and a wrap of darcon peel ply.

It might take some filling, but this was definitely a step up from the payload tube.

Stay tuned!
Alex
This time I put my epoxy mixing bowl in a small container of ice water. This helps control thermal runaways. The cold water keeps the epoxy from heating up and extends the epoxy's pot life. If you do this just remember to keep the water out of the epoxy!
I like to set my fiberglass and peel ply under the tube when I'm wetting it out. That way, if the epoxy drips off the tube it lands of the fiberglass and doesn't go to waste.
Here's the tube with both wraps of fiberglass and a wrap of darcon peel ply.
It might take some filling, but this was definitely a step up from the payload tube.
Stay tuned!
Alex
Looking nice! Now the weather is not so cold you can get some stuff done.
-Ken
-Ken
JDcluster
Well-Known Member
How big was the container that you mixed the epoxy in?
It will "kick" quicker in a smaller container than a larger one.
JD
It will "kick" quicker in a smaller container than a larger one.
JD
Aksrockets
Now with 8% more aluminum
- Joined
- Apr 1, 2011
- Messages
- 3,505
- Reaction score
- 14
I got a TON of work done on this thing today. It's the first day of spring break so I've got a lot of time on my hands. No homework, no school, no other obligations...
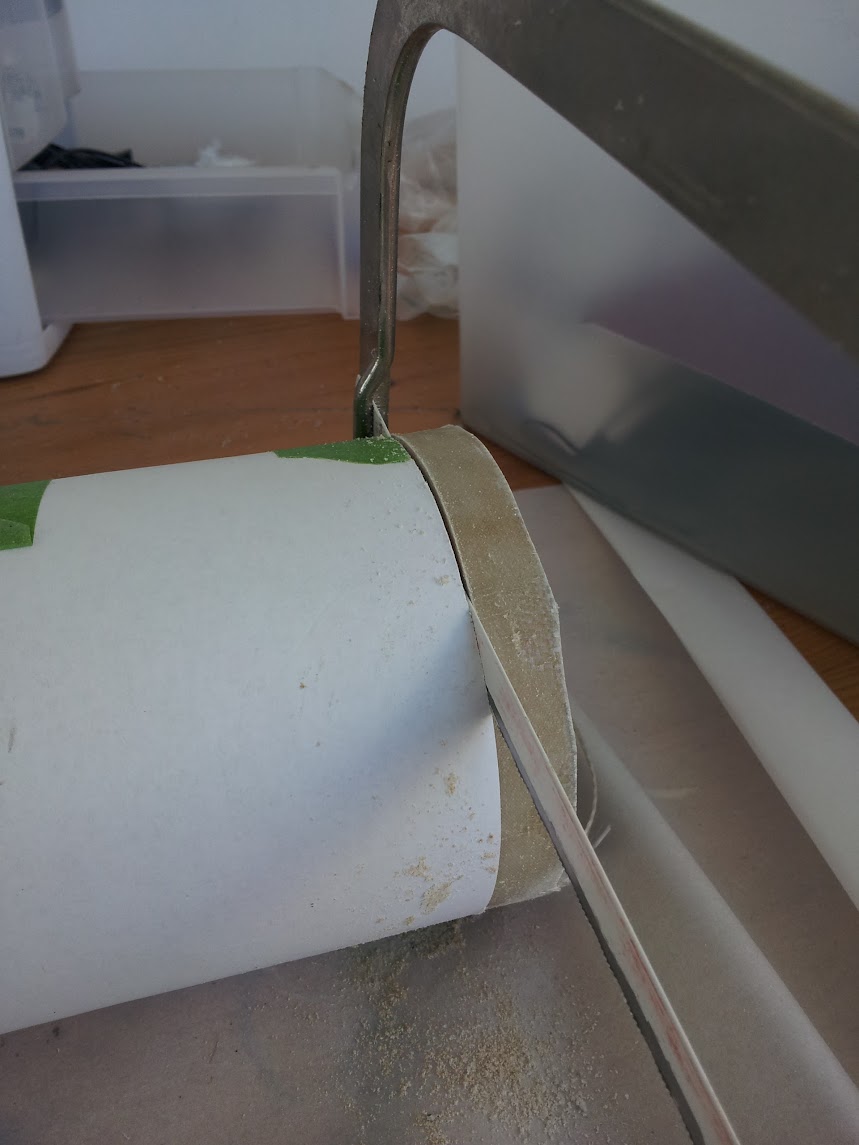
I started off by trimming the ends of the tube. Both ends had small imperfections and small sections that were not wetted out. I decided to trim about 1/2" off both ends. I wrapped the tubes with a peice of printer paper, secured with tape. This serves as my guide so I get perfectly square ends. Then, I go around the tube once with a hack saw. This is my procedure with everything from phenolic to fiberglass. The hacksaw made light work of the fiberglass and paper.
Next, I got to work on my fins. I printed out fin templates and taped them to whats left of my 1/4in plywood.
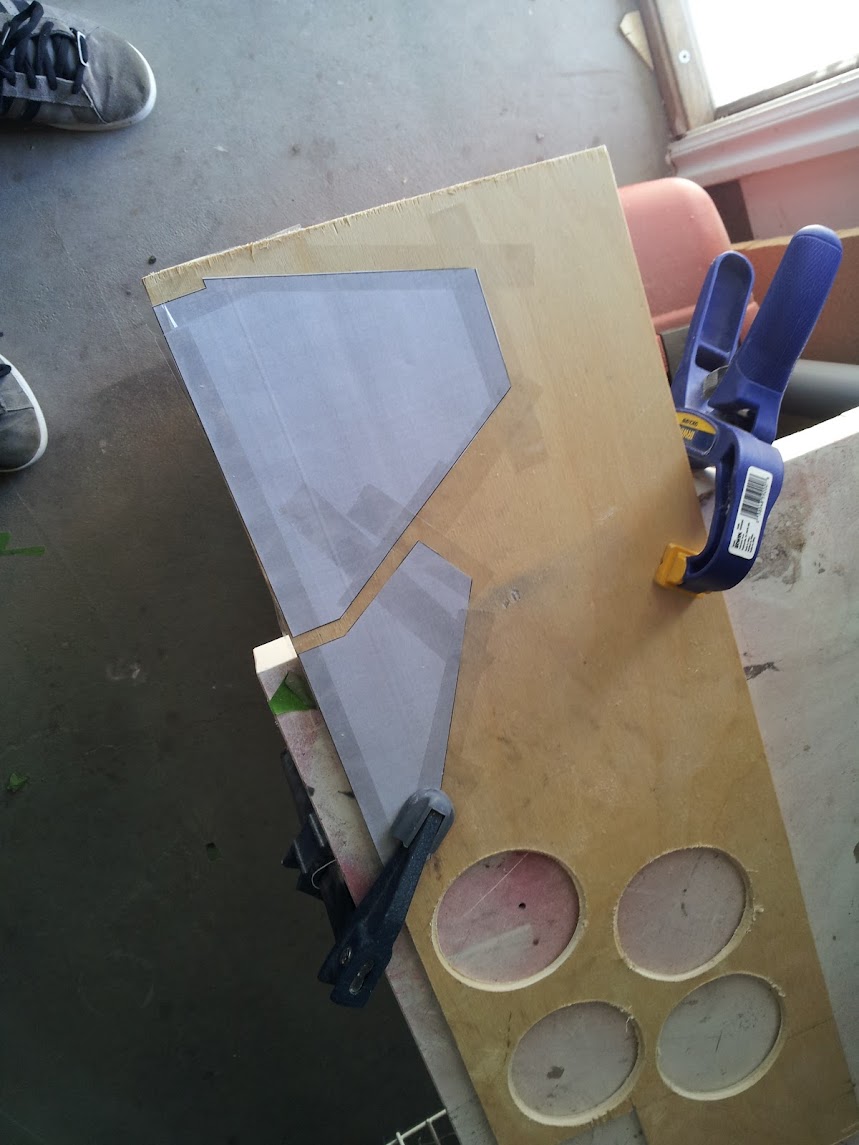
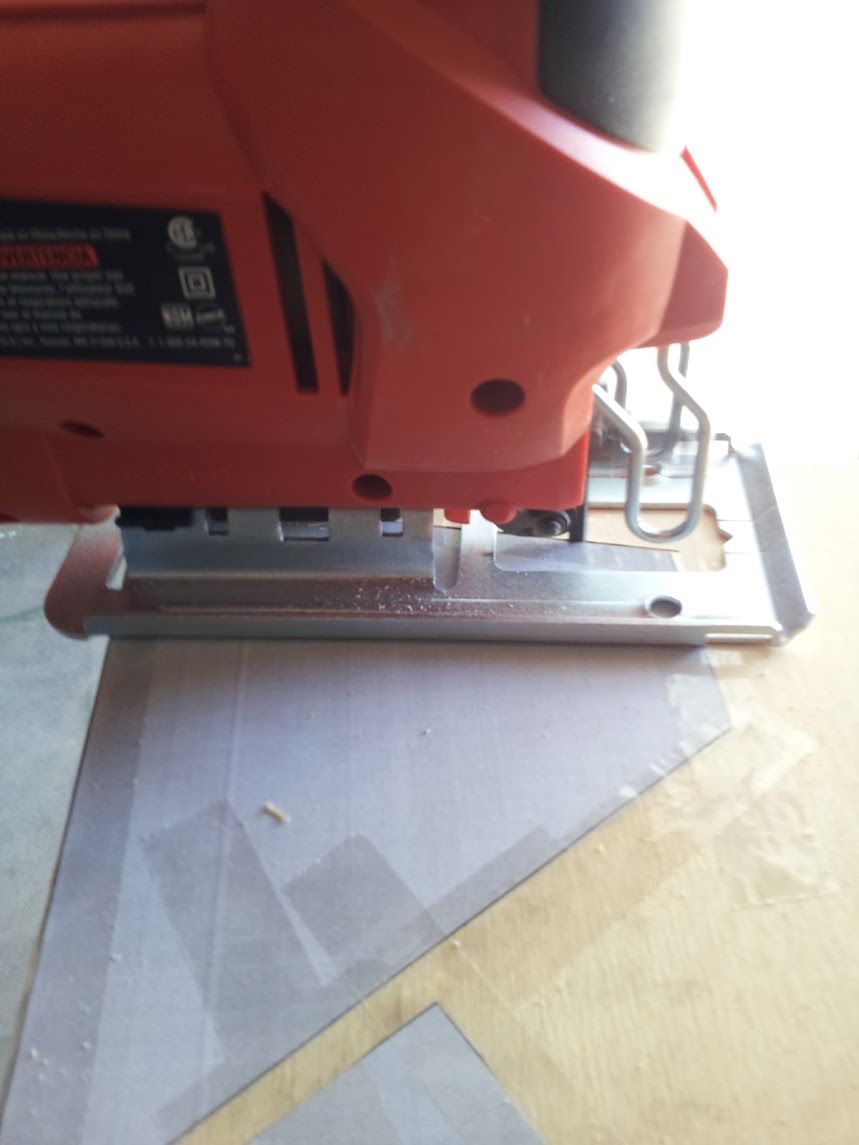
The fins were cut out using a jig saw and a fine tooth blade. I really love my jigsaw!
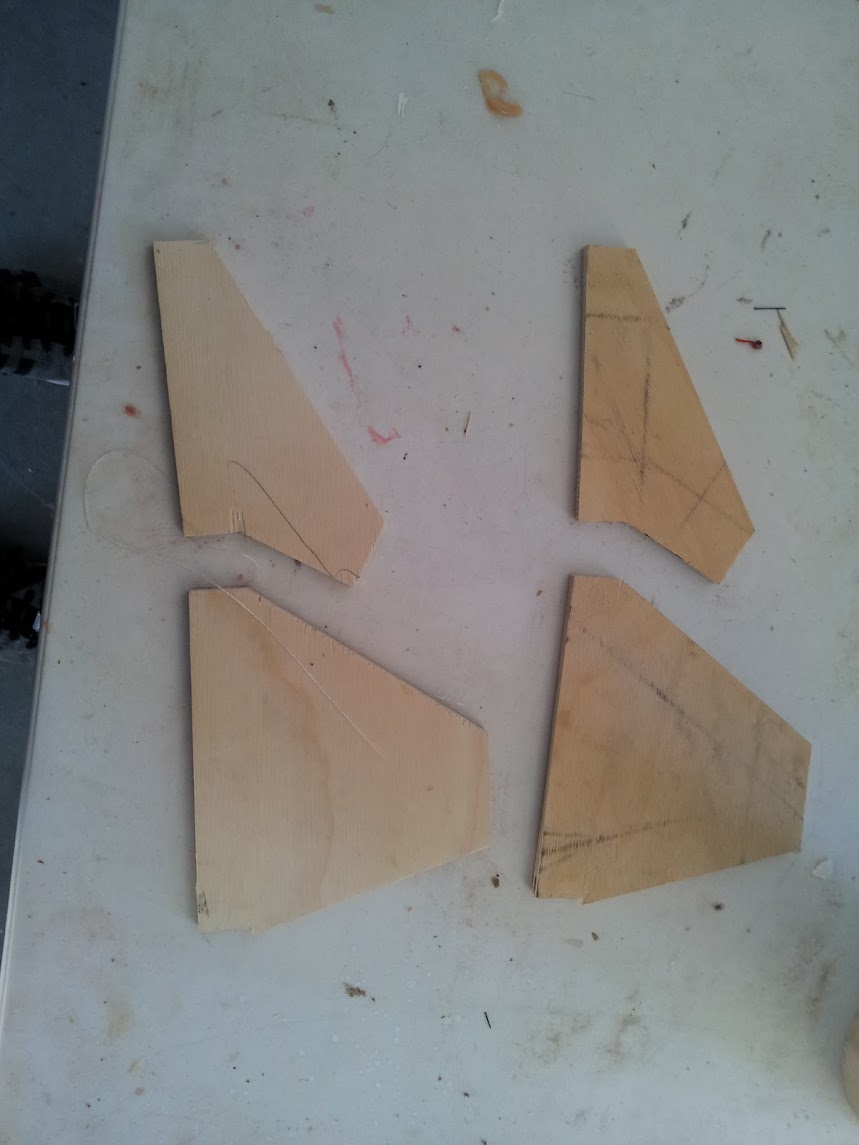
Unfortunately, I was only able to get 2 pairs of fins out before I ran out of plywood. I make a quick trip to the hobby store, only to find out that they did not carry 1/4 ply.
The fins look a little rough, but that's okay. I'll be covering these with a layer of FG anyway. That will help smooth out the slivers and imperfections.
On to the fin slots!
I marked the tube with the fin guide tool from Payloadbay.com. I prefer using this over the fin wrap tool.
I made vertical lines on the tube using a door jam and a pencil.

I cut slots a little differently then everyone else. I start the slot with a sharp exacto knife or dremel, depending on the material. Then after I make the "plunge cut" I slot the tube using my mini hacksaw. With glassed cardboard tubes, a sharp hobby knife or dremel works well too. I just didn't want to mess with sore fingers or large amounts of dust.
It's starting to finally look like a rocket! Here is a dry fit picture.

Alex
I started off by trimming the ends of the tube. Both ends had small imperfections and small sections that were not wetted out. I decided to trim about 1/2" off both ends. I wrapped the tubes with a peice of printer paper, secured with tape. This serves as my guide so I get perfectly square ends. Then, I go around the tube once with a hack saw. This is my procedure with everything from phenolic to fiberglass. The hacksaw made light work of the fiberglass and paper.
Next, I got to work on my fins. I printed out fin templates and taped them to whats left of my 1/4in plywood.
The fins were cut out using a jig saw and a fine tooth blade. I really love my jigsaw!
Unfortunately, I was only able to get 2 pairs of fins out before I ran out of plywood. I make a quick trip to the hobby store, only to find out that they did not carry 1/4 ply.
The fins look a little rough, but that's okay. I'll be covering these with a layer of FG anyway. That will help smooth out the slivers and imperfections.
On to the fin slots!
I marked the tube with the fin guide tool from Payloadbay.com. I prefer using this over the fin wrap tool.
I made vertical lines on the tube using a door jam and a pencil.
I cut slots a little differently then everyone else. I start the slot with a sharp exacto knife or dremel, depending on the material. Then after I make the "plunge cut" I slot the tube using my mini hacksaw. With glassed cardboard tubes, a sharp hobby knife or dremel works well too. I just didn't want to mess with sore fingers or large amounts of dust.
It's starting to finally look like a rocket! Here is a dry fit picture.
Alex
Last edited:
Aksrockets
Now with 8% more aluminum
- Joined
- Apr 1, 2011
- Messages
- 3,505
- Reaction score
- 14
I also have a name for this bird. MasonH suggested "Cherry Bomb". That sounded okay to me so Cherry Bomb, it is!
Alex
Alex
Hope it has a better fate than the last "Cherry Bomb" I saw flyI also have a name for this bird. MasonH suggested "Cherry Bomb". That sounded okay to me so Cherry Bomb, it is!

Eat, sleep, and Fly
Well-Known Member
- Joined
- Jan 4, 2012
- Messages
- 735
- Reaction score
- 3
Hope it has a better fate than the last "Cherry Bomb" I saw fly
View attachment 124147
View attachment 124146
That is bad, but the shot is the coolest thing ever!!! I mean, the second one...
MasonH
Well-Known Member
- Joined
- Aug 20, 2011
- Messages
- 2,335
- Reaction score
- 1
I am just glad I can still come up with decent names. I helped with the name of BB's "Misled Priorities", the name of this, and the name/paint scheme of "College Funds". Key word is Helped. :grin:I also have a name for this bird. MasonH suggested "Cherry Bomb". That sounded okay to me so Cherry Bomb, it is!
Alex
blackjack2564
Crazy Jim's Gone Banana's
Yeah that was a real BOOM or should I say "Ka-Boom". [thank-you Clifton, for the great motor!LOL]
Be forWARNED.... I was the 3rd one using that name in 4 yrs.....& the 3rd one to go boom-boom!
Hope yours doesn't turn into a fireworks.Actually was one of my favorite name/color schemes......feel free to use any or all from the cherry bombs to the flaming name. Mine is dead but yours .......
"IT'S ALIVE"!!!!!
Aksrockets
Now with 8% more aluminum
- Joined
- Apr 1, 2011
- Messages
- 3,505
- Reaction score
- 14
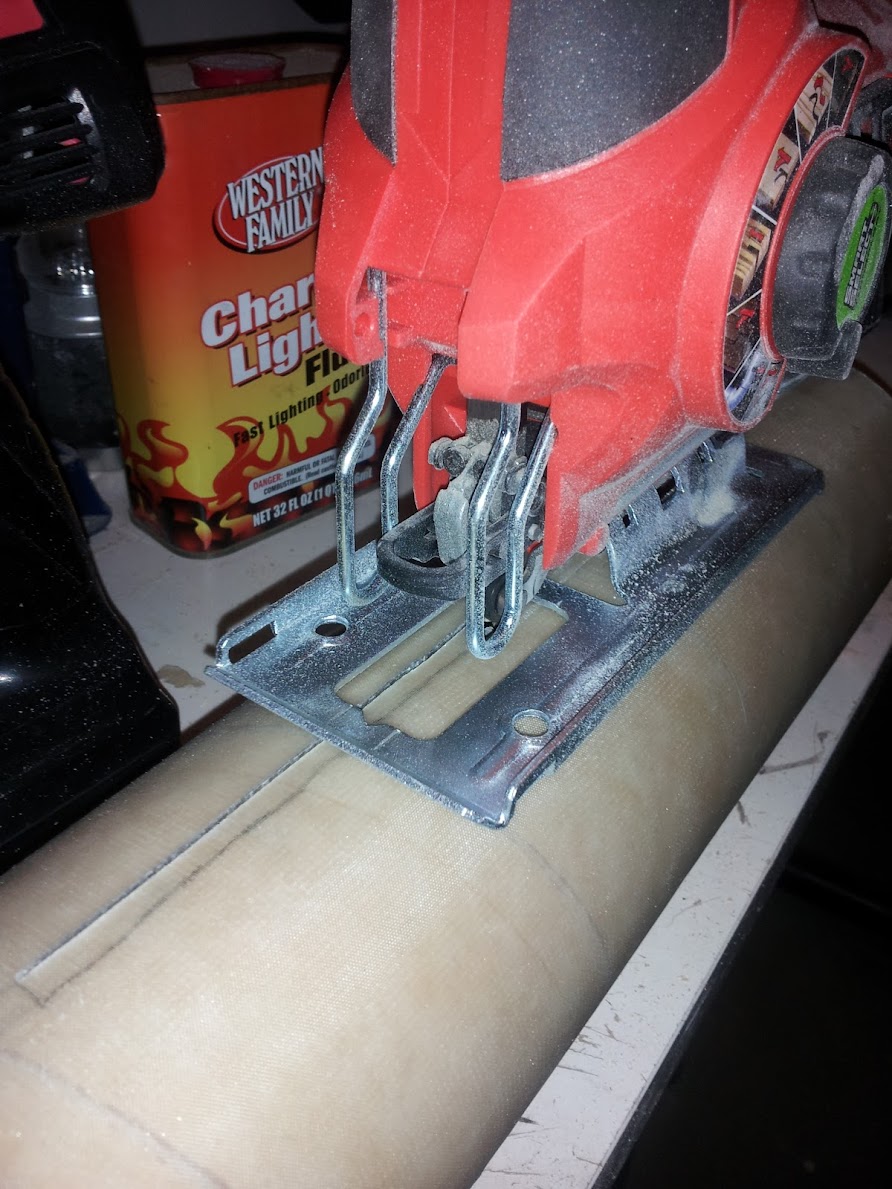
I did the last set of slots a little differently. I tested out a method for slotting that would work well with tough airframes (fiberglass, CF, Bluetube...). It doesn't require and jigs or expensive power tools. Just a drill, some clams and a jigsaw.
The first thing I did was drill a hole a little wider then 1/4in in the back of the slot.
Then, I insert my jigsaw blade through that and cut along my pre-drawn lines.
Ignore the can of lighter fluid. We had a BBQ yesterday.
Cutting....Cutting...Cutting....
Done! The aft slot turned out a little sloppy. I couldn't see where my markings were on the tube too well. The fins are loose but still fit fine!
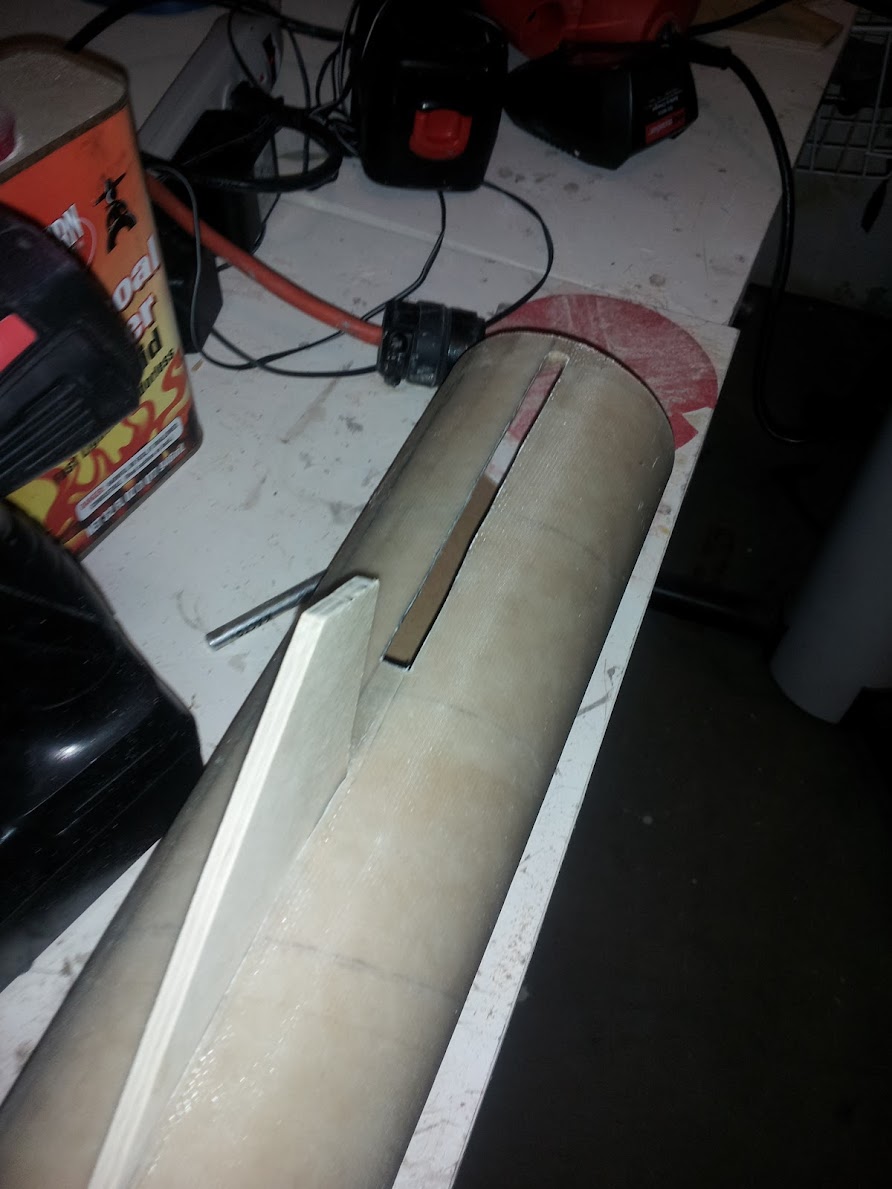
I think this method worked pretty well! I can't wait to try it on a fiberglass tube too see how that turns out.
Alex
The first thing I did was drill a hole a little wider then 1/4in in the back of the slot.
Then, I insert my jigsaw blade through that and cut along my pre-drawn lines.
Ignore the can of lighter fluid. We had a BBQ yesterday.
Cutting....Cutting...Cutting....
Done! The aft slot turned out a little sloppy. I couldn't see where my markings were on the tube too well. The fins are loose but still fit fine!
I think this method worked pretty well! I can't wait to try it on a fiberglass tube too see how that turns out.
Alex
- Joined
- Nov 24, 2009
- Messages
- 4,758
- Reaction score
- 1,454
Yeah that was a real BOOM or should I say "Ka-Boom". [thank-you Clifton, for the great motor!LOL]
Be forWARNED.... I was the 3rd one using that name in 4 yrs.....& the 3rd one to go boom-boom!
Hope yours doesn't turn into a fireworks.Actually was one of my favorite name/color schemes......feel free to use any or all from the cherry bombs to the flaming name. Mine is dead but yours .......
"IT'S ALIVE"!!!!!
I told you I would fix that thing for ya Jim :tongue:
I'm still fond of that nice, slow pitch-increasing sound it was making as you were pounding the bulkhead further into the case.
I was just going to warm him about the name, but I guess that's taken care of :wink:
Great looking rocket, Alex!
Braden
Aksrockets
Now with 8% more aluminum
- Joined
- Apr 1, 2011
- Messages
- 3,505
- Reaction score
- 14
I did a little more work on this thing today.
I drilled 3 holes for the 1/4in U bolt to be installed. I guess I got a little trigger happy with the drill and accidentally drilled one in the wrong place. I can seal the hole with epoxy pretty easily.

I made small fillets on the back of the hex nuts with 5 minute epoxy.

I peeled off the layer of glassine for better epoxy adhesion.

I tacked the CR in with 5 minute epoxy and gave it a big, messy fillet with Aeropoxy structural

That is all for today!
Alex
I drilled 3 holes for the 1/4in U bolt to be installed. I guess I got a little trigger happy with the drill and accidentally drilled one in the wrong place. I can seal the hole with epoxy pretty easily.
I made small fillets on the back of the hex nuts with 5 minute epoxy.
I peeled off the layer of glassine for better epoxy adhesion.
I tacked the CR in with 5 minute epoxy and gave it a big, messy fillet with Aeropoxy structural
That is all for today!
Alex
johnclifton
Well-Known Member
- Joined
- May 24, 2011
- Messages
- 70
- Reaction score
- 6
Yeah that was a real BOOM or should I say "Ka-Boom". [thank-you Clifton, for the great motor!LOL]QUOTE]
All you lost was a chinzy motor holder. I lost a Kosdon 7600. :rant:
blackjack2564
Crazy Jim's Gone Banana's
Yeah that was a real BOOM or should I say "Ka-Boom". [thank-you Clifton, for the great motor!LOL]QUOTE]
All you lost was a chinzy motor holder. I lost a Kosdon 7600. :rant:
One man's ceiling is another mans floor!
Aksrockets
Now with 8% more aluminum
- Joined
- Apr 1, 2011
- Messages
- 3,505
- Reaction score
- 14
Mason H. kindly donated the shock cord for this thing. He gave me ~15' of 9/16th in TN. I'll use this for the drogue. I have another 15' length of TN that I can use for the Main.
Thanks Mason! You're really helping out a lot with this rocket.
Alex
Thanks Mason! You're really helping out a lot with this rocket.
Alex
Similar threads
- Replies
- 4
- Views
- 431
- Replies
- 10
- Views
- 1K