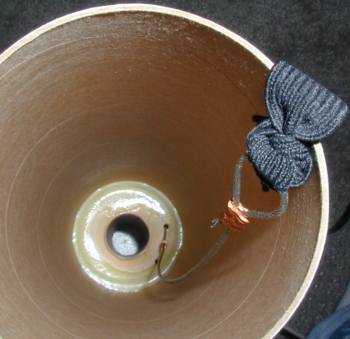
Glueing foreward centering rings

The Rocketry Forum

Help Support The Rocketry Forum:

This site may earn a commission from merchant affiliate links, including eBay, Amazon, and others.

ctaylor821

Member
Joined
Jan 1, 2003
Messages
5
Reaction score
0
What is your guys' method of getting epoxy to the foreward centering ring(s)? I have tried many ways but i don't think they work very well. Any help would be much appreciated. Thanks.
 
Personally, it depends on the size of the rocket. If it's a small rocket, I'll use a small dowel (wooden shishkabob skewers from the grocery store work great, and they're about a buck for a pack of 50). If it's a really big rocket, I'll take a long dowel and pour a big glob of epoxy down the dowel to the centering ring and then rotate the body around till it creates a fillet and/or epoxy well around the entire centering ring.

50 bucks says someone else comes up with a better idea though! :)
 
Here's what I do:

I glue a tongue depressor onto a 1/4" dowel rod. Stick it in the end of the rocket to where the centering ring will be positioned. Pull back 1/2" and mark the dowel rod where it aligns with the rear of the bodytube. Mix epoxy and pick it up with the tongue depressor. Stick it in the end of the bodytube to where the mark lines up with the bodytube. Keeping the mark in sight paint the inside of the tube with epoxy. It usually takes several times until you will get enough epoxy inside. Slide your centering ring/motor mount into position. At this point I will give the bodytube a few spins to evenly distribute the epoxy. Use a flashlight to see the result. Works great. :D

Swimmer
 
For short-reach jobs, the throw-away chopsticks work well. I never leave a set behind.

The tongue depressor idea sounds good. A dowel by itself takes a lot of dippin'.
 
I have tried almost all of the methods stated and it depends on model diameter and depth of the fillet on which one works best. For models above 4", I reach in and pour right from the cup. 4" models and smaller I have done the same if the inside CR was close enough to the rear. I used to use the popsicle stick, but now use a modified version.

I glue to sticks together lengthwise to make a trough, then tape about 1" of the rear to a dowel. I fill the V-shaped "trough" full of epoxy and reach in and pour, making sure you pour BELOW the line. That way when you insert your motor mount with upper ring installed, it pushes the glue upwards and covers well...twist it back and forth too to get a good glue purchase. I even lightly coat the edge of the CR prior to insertion so it is pre-saturated/wet when installing and will bond even better.

If you are using Quantum, Fiberglass or Carbon Fiber tubing, coat the top side of the CR wood face with epoxy before installing. This light "Glazed" surface with allow you to clean the model with a water hose or in the sink, without worry of the wood getting water soaked as it is coated and protected by the layer of epoxy.

Carl
 
Well I have used them all.
Recently I have been using some small plastic tubing and a 60cc irrigation(medical) syringe. I use some silicon sealer to attach the tubing to the syringe(usually). Then I tape the tubing to a long dowel..
I then remove the plunger from the syringe and pour in the epoxy and direct the dowel.I usually replace the plunger. This works well with West systems and "thinner" epoxy........
Sounds complicated but it isnt..it is easy to get the epoxy exactly where you want....not down the MMT!!
Another thing I do is to put the forward centering ring 1/2 inch from the end of the MMT.This gives a nice area for the epoxy to build up.....
 
One good idea i though of is using a cheap brush and a dowel. Attach the brush to the dowel and brush the epoxy on. You can get cheap brushes at about any hardware store. And you can really get the epoxy on where you want it.
 
I have also done a lot of the things mentioned. The syringe didn't work for me because the epoxy was too thick. Take this as a warning. Don't put bob smith epoxy (30 min) into a syringe. It got blocked up and pretty much exploded all over me!:eek:

I managed to catch, literally catch, the dripping epoxy before a drop reached the floor but you may not be so lucky.:)

I mostly use the popsicle stick on the end of the dowel method or I just reach into the airframe.

David
 
When building my Fat Cat's Hypersonic Transport: I tested a new trick while installing this motor mount. What I did was to place a fairly large amount of glue on the upper side of each of the centering rings about 1/8" from the edge. I then pushed the motor mount into the airframe until it was 1/4" from its final position. Then by holding the airframe horizontally and slowing turning it, allowed the glue to flow off the edge of the centering ring to meet the airframe. Slowly turning it allowed for it to meet all the way around. I could visually see this happening on the upper centering ring by looking down the airframe from the top. Once touching all the way around, I then pushed the motor mount up that final 1/4" into position and sat it on its end to dry. You need a glue that is strong and will flow initially. I figure 1-hour epoxy would work, or what I used: ProBond Polyurethane Glue which worked great!

fc_hypersonic04.jpg


-Nick
 
The thing that works best for me [though is certainly not fool-proof] is the plastic tubing that Raven mentioned. My set-up isn't as sophisticated as his [I haven't tried a syringe]. Basically, I use either plastic or brass tubing 1/4 to 1/2 inch in diameter, get as much 15 minute epoxy in there as I can, and put it in the rocket down to the upper centering ring.

Before I've even gotten to this stage, when I insert the motor mount into the airframe, I use a profuse amount of epoxy, and twist the motor mount as I push it up into the airframe. With narrower centering rings [like, say, 3.00-2.14], the epoxy will cover the whole ring, making the task of pouring more epoxy on top of that unnecessary. With a wider ring [which, theoretically, would be found in a wider tube], you would need to get in there with some additional epoxy.

I like the brush method someone else suggested; I may have to try that next time. It'll more effectively spread it around that a just dumping it out of a tube. Although, in typing this, I just got an idea for a way to do a makeshift syringe with the brass tubing and a wood dowel that fits snugly inside the brass tubing [use the wood dowel as a 'plunger' to push the epoxy out of the tube. Anyone want to try this and let me know how it works?
 
On all my HPR models, I use the same technique;

I mix up a small dispenser cup of Bob Smith's 20 min Finishing epoxy, and pour it into the rocket in such a way as to hit the centering ring only (a steady hand is needed for this). The 20 min. flows like water, and tends to seep between the ring and bodytube, bonding the two together. Once this has set-up, I will go back doing the same procedure only this time using 30 min. epoxy, and by rotating the tube I can create my fillet.

How do I know this works..I pulled one of my **"Fenceposted" rockets out of the ground and proceded to dismantle different parts just to see how well they were actually holding up. The front centering ring was bonded 100% to the tubing.

**Due to a seperation, the booster was a total loss, and allowed me to disassemble.

Johnnie Paul
 
Back
Top